

Table of contents
- Advantages of using Docker
- Installing Docker
- Using Docker for development
- Using Docker with Django
- Writing your Docker file
- Docker Compose
- Creating the Docker Compose configuration
- Running our development server
- Configuring our PostgreSQL database
- Setting up Django and configuring our database
- PostgreSQL adaptor - Psycopg2
- Installing Psycopg2
- Fixing the database race condition
- Implementing our wait_for_db custom command
In this tutorial, I will guide you through the process of creating a new Django project using Docker and PostgreSQL. Although Django comes with built-in support for SQLite, it is recommended to use a "real" database like PostgreSQL even for local development.
This approach ensures that your local environment closely matches the production environment, providing a more accurate representation of how your application will behave in production. By using PostgreSQL from the beginning, you can avoid potential compatibility issues and have a smoother transition when deploying your Django app to a production server.
When it comes to running PostgreSQL locally, you have a couple of options. One way is to use a tool like Postgres.app, which allows you to set up and manage a local PostgreSQL database on your machine. However, an increasingly popular choice among developers is to use Docker.
Docker is a powerful tool that allows you to create isolated operating systems, called containers, which encapsulate all the necessary components for your Django project. Think of it as a virtual environment specifically tailored to your project's needs. Within this container, you can include dependencies, the PostgreSQL database, caching services like Redis, and any other tools required by your Django app.
Advantages of using Docker
Using Docker provides several advantages.
First, it ensures consistency across different development environments, making it easier to collaborate with other developers or deploy your app to a production server. Docker eliminates the "it works on my machine" problem by packaging all the dependencies and configurations within the container.
Secondly, Docker simplifies the setup process. Rather than manually installing and configuring each component, Docker allows you to define everything in a single configuration file, making it easy to set up a consistent environment across different machines.
Docker removes the hassle of local development setup by running a single Docker image that contains your entire project. This simplifies collaboration within teams as the image can be easily shared and ensures consistency across different development environments. With Docker, you can focus on writing code without worrying about software dependencies or local database configurations.
Overall, Docker provides a convenient and efficient way to manage your development environment, ensuring that your Django project runs smoothly and consistently.
Installing Docker
I will be using macOS Monterey Version 12.6.6 and you should check the relevant documentation for your system. Before you start check to see if you have python installed. On OSX Open Terminal and run the following command to check if Python is installed and view the version:
❯ python3 --version
Python 3.11.4
Next, Install Docker Desktop, which can be downloaded from here:
https://www.docker.com/products/docker-desktop/
After installation, in the terminal run the following command to check if Docker is installed and view the version:
❯ docker --version
Docker version 24.0.2, build cb74dfc
If Docker is not installed or you need to upgrade it, you can download and install the latest version of Docker Desktop from the official Docker website.
Docker Compose is an additional tool that is automatically included with Mac and Windows downloads of Docker. However, if you are on Linux, you will need to add it manually. Check that the Docker Compose is installed by running the following in the Terminal:
❯ docker-compose --version
Docker Compose version v2.18.1
Docker Compose is a tool for defining and running multi-container Docker applications. With Compose, you use a YAML file to configure your application's services, networks, and volumes. Then, with a single command, you can create and start all the services from your configuration.
Using Docker for development
Now you have Docker installed; you can use Docker with Django to create a new development server. We are going to set up a new Django project, we'll also add testing and linting to our new project and we'll use Docker Compose to configure our development server.
To use Docker when configuring a Django project you first need to define a Docker file. This Docker file will contain all the operating dependencies that our project needs. Essentially, a Dockerfile is a script that contains all the commands to build a Docker image. It is used to automate the creation of a Docker image that contains all the dependencies and configurations required to run an application.
You also need to create a Docker compose configuration. A Docker Compose configuration is a YAML file that defines the services, networks, and volumes for a Docker application. Essentially it will tell Docker how to run the images that are created from our Docker file configuration.
We are going to run all the commands needed for the project through Docker Compose.
Using Docker with Django
There are many benefits to using Docker for your Django project:
Consistent Development and production environment
Docker allows you to package your application and its dependencies into a container, which can then be run on any machine that has Docker installed. This means that you can develop your application on your local machine, and then deploy it to a production server with the confidence that it will work the same way in both environments.Easier collaboration
With Docker, you can package your application and its dependencies into a container, which can then be shared with other developers on your team. This means that everyone on your team can work in the same environment, regardless of their operating system or other dependencies. Docker allows you to easily share your application with others, such as testers or clients, by simply sharing the container image.Capture all dependencies as code
One of the benefits of using Docker is that it allows you to manage dependencies more easily. You can define all the dependencies your application needs in a Dockerfile, which is a text file that specifies the instructions for building a Docker image. This ensures that all developers on your team are using the same dependencies, and makes it easier to manage and update dependencies over time.Easier cleanup
When you are finished with your project you can easily remove all the dependencies like the database and associated libraries from your system.
Overall. all these benefits save you a lot of time when working with your Django project and I highly recommend using Docker whenever you are working with a Django project. However, there are some drawbacks to be aware of, an important drawback is that Visual Studio Code (my preferred IDE) is unable to access the interpreter of your Python project and makes it harder to use VS Code features like the debugging and linting tools. So you will need to use the terminal to run the linting and debugging for you.
Writing your Docker file
To use Docker, we first need to create a Dockerfile. A Dockerfile is simply a text file that contains a set of instructions for building a Docker image. This file contains a list of steps that Docker will use to create an image for our project. We start by choosing a base image that matches the programming language we're using. For example, if we're building a Django/Python project, we'll use the Python base image that's available on Docker Hub.
Next, we install any dependencies that our project needs. These are operating system-level dependencies that our project relies on to run. We also set up users inside our Docker container, which is needed to run our application.
Docker Compose
We then set up Docker Compose, which defines how Docker images should be used to run our development server. We define each image as a different service and give each service a name. For example, I will use app as my service name. We also set up port mappings, which allow us to connect to the containers that are running our application. Finally, we set up volume mappings, which allow the code in our project to be accessed from inside the Docker container.
So, in addition to defining the services, Docker Compose allows you to specify networks and volumes for your containers. Networks facilitate communication between containers, enabling them to interact with each other. Volumes provide a way to persist data generated by the containers, ensuring that data is not lost when containers are stopped or removed.
Docker Compose is a tool that allows you to define and manage multi-container Docker applications. It simplifies the process of running multiple Docker containers together as a cohesive application by using a declarative YAML file called
docker-compose.yml.With Docker Compose, you can define the services that make up your application, specify their configurations, and establish the relationships and dependencies between them. Each service typically corresponds to a separate Docker image, which can be pulled from a Docker registry or built locally using a Docker file.
The
docker-compose.ymlfile serves as a blueprint for your application's architecture. It includes information such as the base image, container names, exposed ports, environment variables, volumes, and more. By defining all these details in a single file, you can easily manage and orchestrate the deployment and scaling of your application.
Once you have defined your Docker Compose configuration, you can use the docker-compose command-line tool to manage your application. It allows you to start, stop, and restart containers, view their logs, scale services, and more, all with a single command.
For example here is an example of running a Django manage.py command through docker-compose command-line tool:
docker-compose run --rm app sh -c "python manage.py createsuperuser"
The docker-compose run command is used to run a one-time command within a Docker container based on the specified service in your Docker Compose configuration. It allows you to execute a command in an ephemeral container that inherits the configuration and dependencies defined for the specified service.
An ephemeral container refers to a short-lived container that is created to perform a specific task or execute a particular command. It is designed to exist only for the duration of that task and is typically discarded once the task is completed.
Ephemeral containers provide a lightweight and isolated environment for running individual tasks or commands. They allow you to execute commands within a controlled environment without the need to start and manage a long-running container. Ephemeral containers are particularly useful for running one-off tasks, such as database migrations, executing tests, creating backups, or performing administrative tasks.
When you run the docker-compose run command, Docker Compose does the following:
Checks the configuration in the
docker-compose.ymlfile to determine the service's image, environment variables, volumes, and other settings.Creates a new container based on the service's image.
Mounts the specified volumes and sets the appropriate environment variables for the container.
Executes the specified command within the container.
In the above command,app refers to the service name defined in my docker-compose.yml file. app represents the Docker service in which you want to execute the command. The service name can be customized according to your project's configuration.
The --rm flag instructs Docker to remove the container after it finishes running the command. This helps keep your system clean by automatically cleaning up the container once it has completed its task. It is useful for one-off commands that do not require persistent containers.
Including the --rm flag, whenever you run a single command, is advisable as it helps prevent the accumulation of leftover containers in your system. By using this flag, you ensure that each container created for the command is automatically removed once the command finishes its execution. This practice promotes a clean and organized environment, avoiding the accumulation of unnecessary containers and simplifying the management of your Docker resources.
The sh -c "python manage.py createsuperuser" part of the command specifies the command to be executed within the container. In this example, it runs the Django development server by executing the python manage.py createsuperuser command. The sh -c part is used to execute the command within the container's shell.
The command says we want to run a single command on our container. The first part is the Docker Compose syntax docker-compose run --rm app we need to use this syntax before every command that we run.
The second part sh -c "python manage.py createsuperuser" is the command that is going to be run on the container. We always start with sh -c if we are going to be running a single command on the container, so we can wrap our command in quotes and easily see which command we will be running on the container.
Similarly, we can use the following command in the terminal to run Django's collectstatic command:
docker-compose run --rm app sh -c "python manage.py collectstatic"
Now we have covered some background on Docker, lets creatre a Django project and configure our Docker file. On my mac, I will create a directory called django-docker-example and create the following requirements.txt file for my project:
Django>=4.2.2,<4.3
djangorestframework>=3.14.0,<3.15
Open up the project in VS Code:

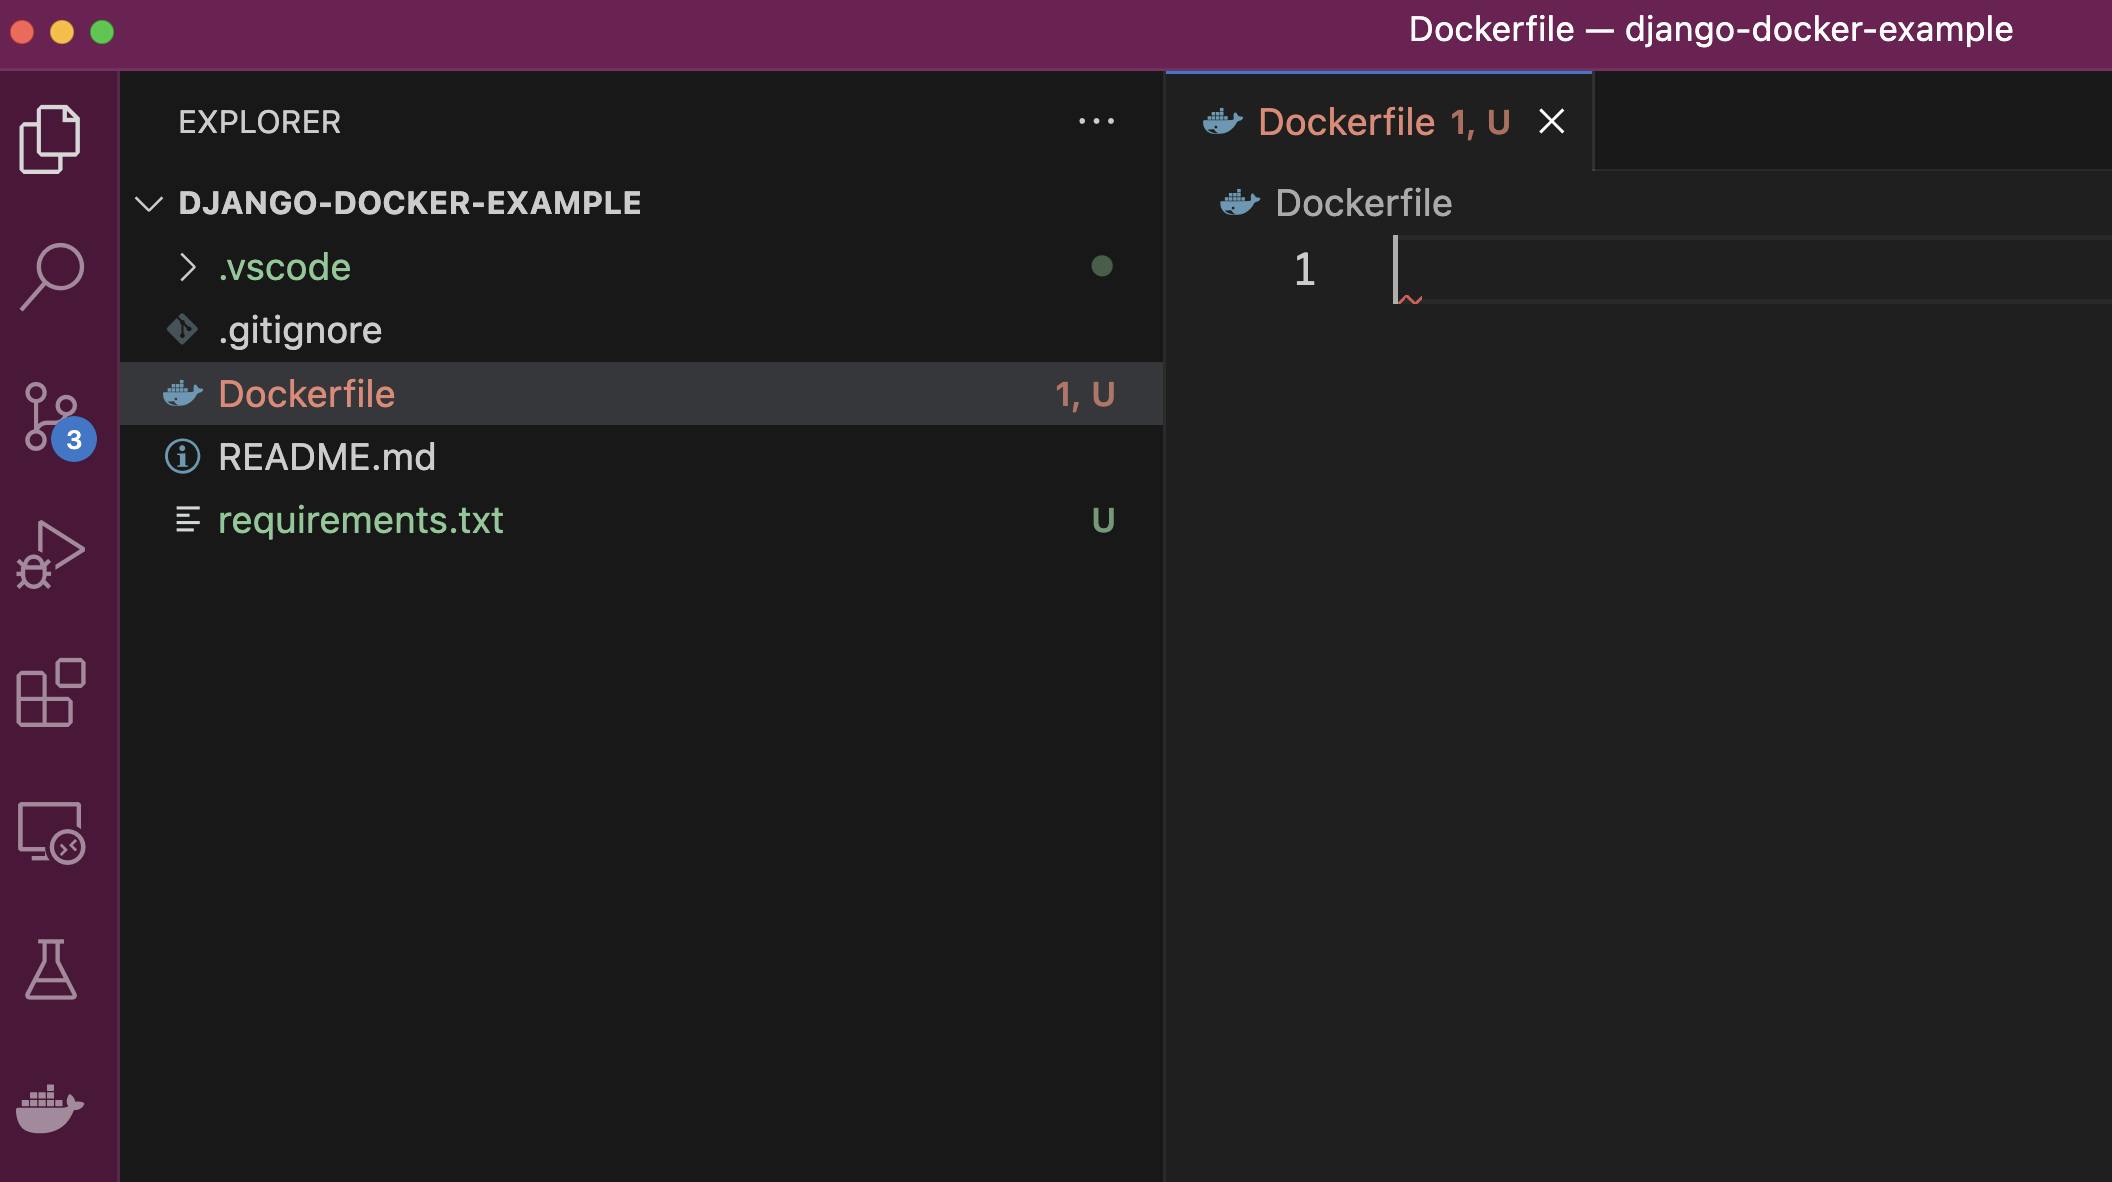
In the project root folder create a new file and call it Dockerfile and in this file we will define the steps that Docker needs to build our image.
The first step is to define the name of the image that we're going to be using.This is the base image that we're going to pull from Docker Hub that we're going to build on top of to add the dependencies that we need for our project.
As this is a Django project I will be using python:3.9-alpine3.13 as my base image. Alpine is a stripped-back lightweight Linux distribution.
FROM python:3.10-alpine3.13
Docker Hub base images refer to the pre-built, ready-to-use images that are provided by the Docker community. These images serve as the foundation for building Docker containers and provide a starting point for creating application-specific containers.
Base images typically contain a minimal operating system or runtime environment, along with any necessary dependencies, libraries, or tools required for running specific applications or services. They are designed to be used as a base upon which additional layers can be added to create a custom Docker image tailored to your specific needs.
Using the
python:3.9-alpine3.13base image offers benefits such as smaller image size, improved security, efficient resource utilization, and streamlined package management. However, be aware of potential compatibility considerations when using Alpine-based images with certain Python packages.
After defining the image to use, we need to define the MAINTAINER. This instruction is used to specify the author or maintainer of the Docker image. It is typically used to provide contact information or identification for the person or team responsible for maintaining the image.
FROM python:3.10-alpine3.13
LABEL maintainer="@pedbad"
Next, we set the ENV PYTHONUNBUFFERED 1 this instruction in a Dockerfile sets an environment variable called PYTHONUNBUFFERED to a value of 1. This is recommended when we are running Python in a Docker container.
When PYTHONUNBUFFERED is set to 1, it tells Python to run in unbuffered mode. In unbuffered mode, Python's standard output and standard error streams are not buffered, meaning that the output is immediately flushed and displayed in real-time, rather than being stored in a buffer and printed all at once.
The primary reason for setting PYTHONUNBUFFERED to 1 in a Dockerfile is to improve the logging and debugging experience within the Docker container. By enabling unbuffered mode, you can see the output and error messages from your Python application as they happen, rather than waiting for the buffer to fill up or the application to complete.
Using
PYTHONUNBUFFEREDis especially useful when working with containerized applications because the standard output and standard error streams are typically captured by Docker, making it difficult to see real-time logs if buffering is enabled.
FROM python:3.10-alpine3.13
LABEL maintainer="@pedbad"

ENV PYTHONUNBUFFERED 1
Next we add the following directives to our docker file:
FROM python:3.10-alpine3.13
LABEL maintainer="@pedbad"

ENV PYTHONUNBUFFERED 1

COPY ./requirements.txt /tmp/requirements.txt
COPY ./app /app
WORKDIR /app
EXPOSE 8000
We are providing several instructions in our Dovkerfile, Let's go through each instruction and its purpose:
COPY ./requirements.txt /tmp/requirements.txt- This instruction copies the
requirements.txtfile from our local directory (relative to the Dockerfile) to the/tmp/requirements.txtpath inside the Docker container. This is typically done to provide the container with the necessary dependencies specified in therequirements.txtfile.
- This instruction copies the
COPY ./app /app- This instruction copies the contents of our Django
appdirectory from the local directory (relative to the Dockerfile) to the/appdirectory inside the Docker container. We will create this later. This will be the directory that is going to contain our Django app. It includes all the files and directories within theappdirectory.
- This instruction copies the contents of our Django
WORKDIR /app- This instruction sets the working directory inside the Docker container to
/app. It means that any subsequent instructions or commands will be executed in the context of the/appdirectory. This is useful to provide a default working directory for your application. This is the location our Django project is synced to. By doing this we don't need to specify the full path of the Django Management Command.
- This instruction sets the working directory inside the Docker container to
EXPOSE 8000- This instruction informs Docker that the container will listen on port 8000 at runtime. It does not actually publish the port to the host machine. This is useful for documenting the intended network communication of the container, making it easier for users to know which port to expose when running the container.
Overall, this code block sets up the Docker container by copying the requirements.txt file and the app directory from the local directory, sets the working directory to /app, and declares that the container will be listening on port 8000. This provides the foundation for building and running a Docker container for a Django application, where the dependencies are specified in requirements.txt and the application code is located in the app directory.
Next, we are going to add a RUN command that will install some dependencies on our machine:
FROM python:3.10-alpine3.13
LABEL maintainer="@pedbad"

ENV PYTHONUNBUFFERED 1

COPY ./requirements.txt /tmp/requirements.txt
COPY ./app /app
WORKDIR /app
EXPOSE 8000

RUN python -m venv /venv && \
    /venv/bin/pip install --upgrade pip && \
    /venv/bin/pip install -r /tmp/requirements.txt && \
    rm -rf /tmp && \
    adduser \
        --disabled-password \
        --no-create-home \
        django-user

ENV PATH="/venv/bin:$PATH"

USER django-user
The RUN command runs a command on the alpine image that we are using. Let's break down the Dockerfile instructions line by line:
RUN python -m venv /venv && \
This line creates a virtual environment named "venv" in the root directory (/) of the container using thepython -m venvcommand./venv/bin/pip install --upgrade pip && \This line upgrades the
pippackage within the virtual environment by executing the/venv/bin/pip install --upgrade pipcommand./venv/bin/pip install -r /tmp/requirements.txt && \This line installs the Python packages specified in the
requirements.txtfile located at/tmp/requirements.txtThe-rflag indicates that the command should read the package names from the file.rm -rf /tmp && \This line removes the
/tmpdirectory within the container using thermcommand with the-rfflags. It's best practice to keep Docker images as lightweight as possible, so if there are any files you do not need on your actual image, make sure they are removed as part of your build process.adduser --disabled-password --no-create-home django-userThis line adds a new user named "django-user" to the container using the
addusercommand with the--disabled-passwordand--no-create-homeflags.
Again, it is best practice not to use the root user. If theaddusercommand is omitted from the Dockerfile, the container will default to running processes as the default user, which is typically the root user.ENV PATH="/venv/bin:$PATH"This line sets the environment variable
PATHto include the/venv/bindirectory, allowing the executables within the virtual environment to be found and executed directly.USER django-userThis line sets the user context of the container to "django-user".
NOTE: While it is possible to run a Python application within a Docker container without using a virtual environment, using a virtual environment is generally considered a best practice.
Although it is technically possible to install dependencies directly into the system-level Python installation within a Docker container, it can lead to complications and dependencies conflicting with other applications or system-level packages. Using a virtual environment provides a controlled and isolated environment specific to your application, promoting good software development practices and making it easier to manage dependencies and ensure consistency.NOTE: Using a single
RUNcommand with line continuation (&& \) instead of multipleRUNcommands is a best practice in Dockerfiles. It helps to minimize the number of intermediate layers created during the build process, reducing the overall size of the resulting image. EachRUNcommand in a Dockerfile creates a new intermediate layer, and by combining multiple commands into a singleRUNcommand, you can consolidate those layers and optimize the build process.However, note that the use of line continuation should be balanced with readability and maintainability. If the commands become too complex or difficult to understand, it's recommended to split them into multiple
RUNcommands for clarity.
Now we have the Dockerfile make sure you save it in the root of your project directory. Next, create a file named .dockerignore in the same directory where your Dockerfile is located.
A .dockerignore file is used to specify files and directories that should be excluded from the Docker build context. When building a Docker image, Docker looks for a file named .dockerignore in the build context directory and uses its rules to determine which files should be excluded from the build process.
The purpose of the
.dockerignorefile is to optimize the build process by preventing unnecessary files from being sent to the Docker daemon during the build. This can significantly reduce the build time and the size of the resulting image.
#Git
.git
.gitignore

#Docker
.Docker

#Python
app/__pycache__/
app/*/__pycache__/
app/*/*/__pycache__/
app/*/*/*/__pycache__/
.env/
.venv/
venv/
Now you can test building the Docker image. Launch terminal and run the following command from your project root directory, In my case the directory I created called django-docker-example .
❯ docker build .
Remember: Make sure you have the
appdirectory created inside your project. This is where we will be building our Django project. Otherwise you will get the following error:
=> ERROR [3/5] COPY ./app /app

The docker build . command is used to build a Docker image using the Dockerfile located in the current directory (. represents the current directory).
When you run docker build ., Docker looks for a file named "Dockerfile" in the current directory and uses it as the build instructions to create the Docker image.
The docker build command reads the Dockerfile and executes each instruction sequentially, creating a new image layer at each step. Each instruction in the Dockerfile performs a specific action, such as copying files, installing dependencies, or configuring the image.
During the Docker build process, Docker utilizes caching to optimize subsequent builds. Caching can significantly speed up the build time when working with Docker images.
When you build a Docker image, each instruction in the Dockerfile creates a new image layer. Docker uses a layered architecture, where each layer represents a change made to the previous layer. By default, Docker caches the intermediate image layers generated during the build.
By following these instructions you should have successfully configured a Dockerfile for your Django project.
Creating the Docker Compose configuration
Next, we're going to create a Docker compose configuration for our project. Inside our project root directory, we will create a new file called docker-compose.yml
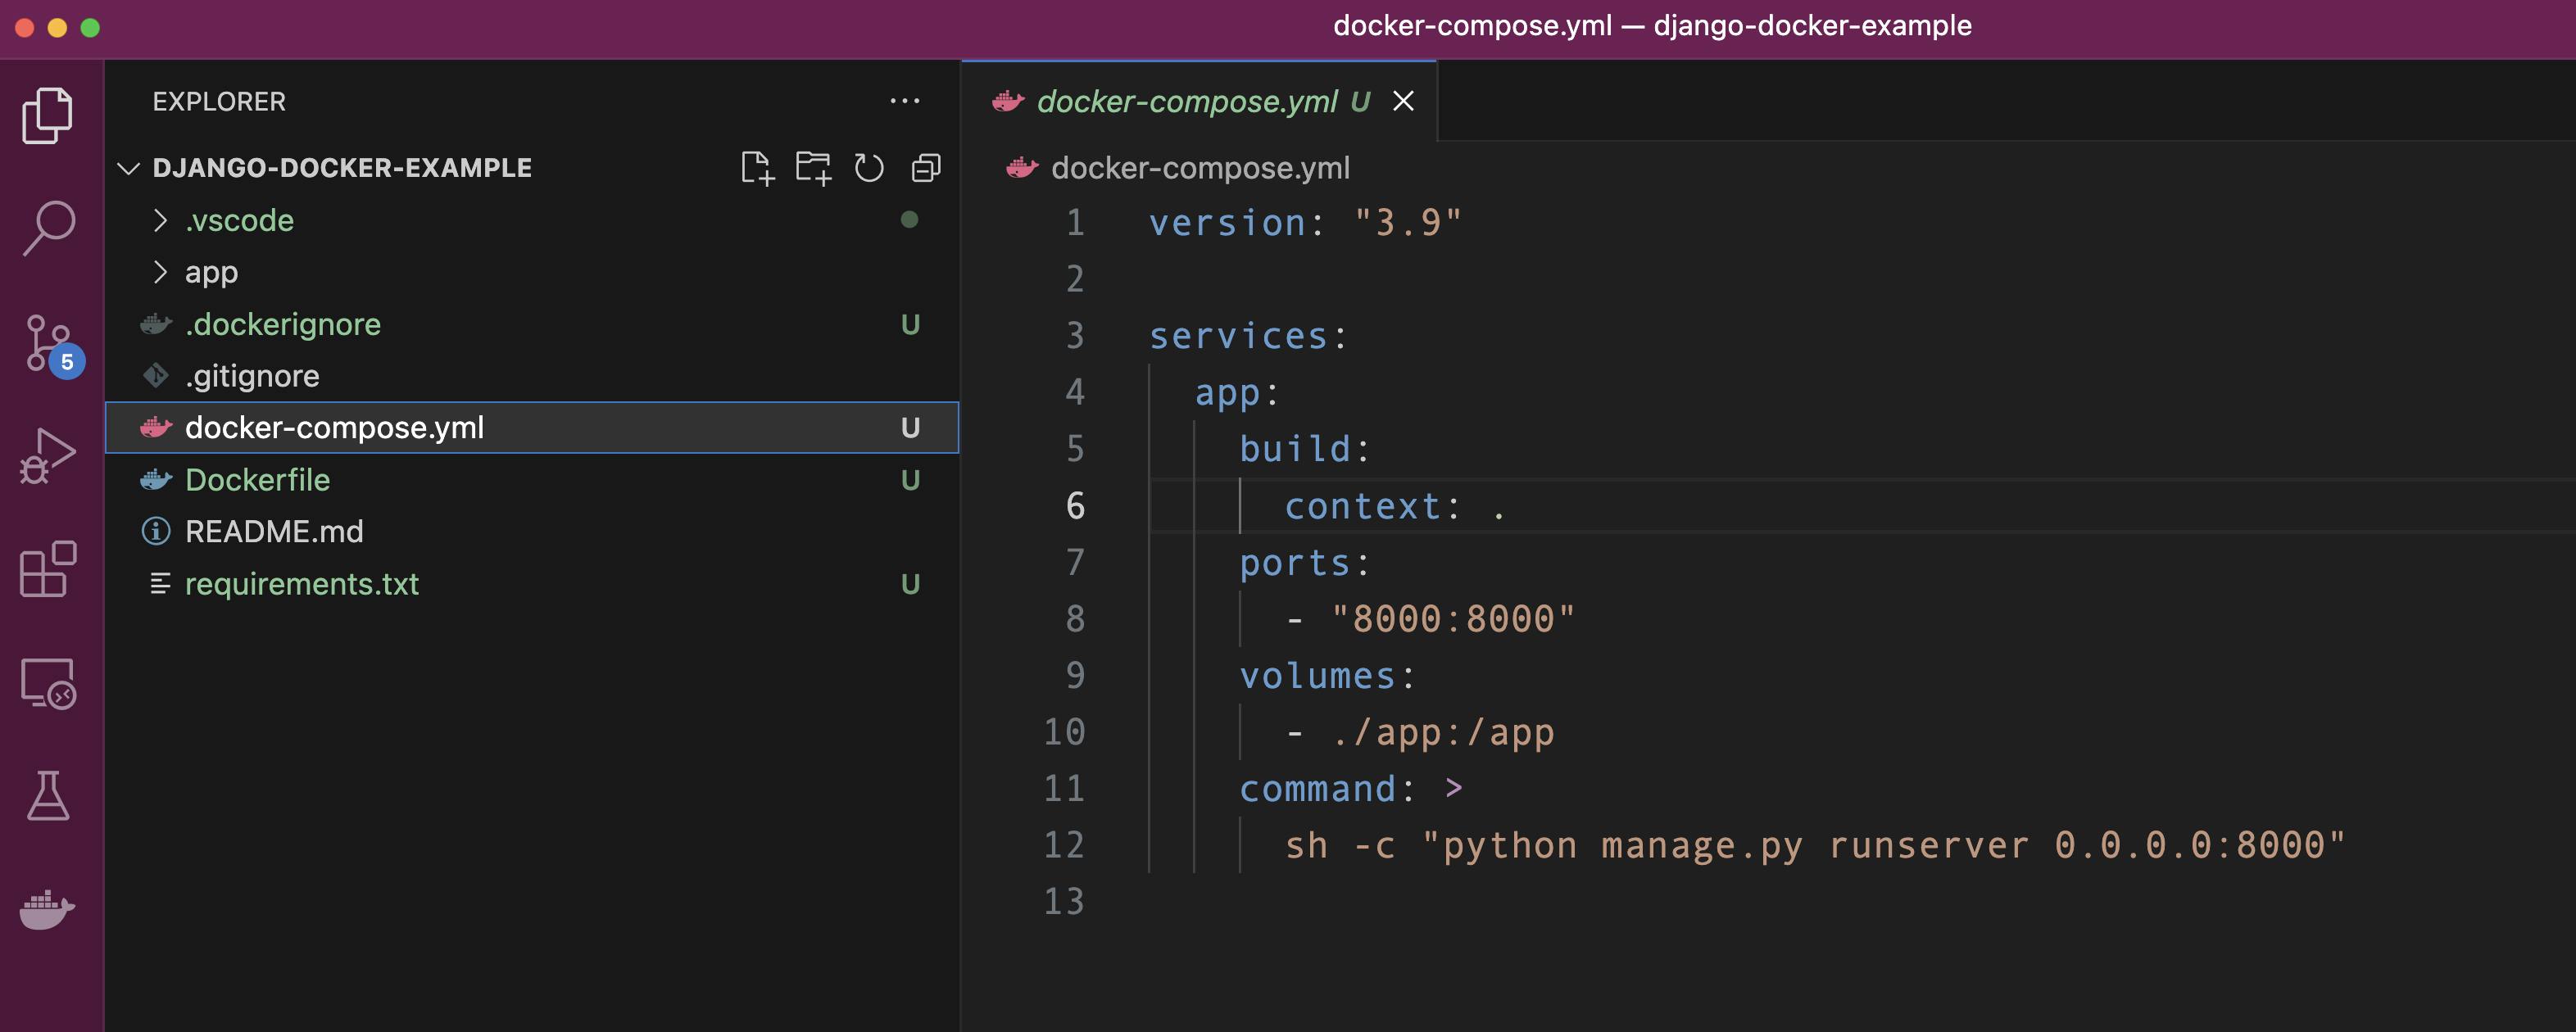
Inside our docker-compose.yml file you will need the following commands:
version: "3.9"

services:
  app:
    build:
        context: .
    ports:
        - "8000:8000"
    volumes:
        - ./app:/app
    command: >
        sh -c "python manage.py runserver 0.0.0.0:8000"
Again, here's an explanation of each line in the provided docker-compose.yml file:
version: "3.9": Specifies the version of the Docker Compose configuration file format being used. This is a versioning mechanism to make sure that the syntax we use here matches the specific version. If Docker releases new versions, this would not break our configuration.services:: This section defines the services that will be created as part of the Docker Compose configuration.app:: The name of the service. In this case, it is named "app".build: .: Specifies the build context for the service. The.indicates that the Dockerfile is located in the current directory.ports:: Specifies the port mapping between the host and the container.- "8000:8000": Maps port 8000 on the host machine to port 8000 in the docker container.
volumes:: Mounts directories or files from the host machine into the container.- ./app:/app: Mounts the./appdirectory on the host to the/appdirectory in the container. The reason we add this is that we want the updates that we make to our code in our local project to be reflected in the running container in real-time. This way we do not need to rebuild the container each time we modify our project code. We want to automatically sync our project code to the code we are running in our docker container.
command: >: Specifies the default command to run when the container starts.
Make sure you save the docker-compose.yml file and then in the terminal run the following command to build our Docker image.
❯ docker-compose build
The docker-compose build command is used to build the Docker images defined in the services of your docker-compose.yml file. When you run docker-compose build, it looks for the specified services in the docker-compose.yml file and builds their corresponding Docker images based on the instructions provided in the associated Dockerfiles.
During the build process, Docker Compose performs the following tasks:
Analyzes the build context: The build context is the directory that contains the Dockerfile and any files or directories referenced in it. Docker Compose gathers all the necessary files and directories from the build context to send them to the Docker daemon for building the image.
Sends the build context to the Docker daemon: The build context is sent to the Docker daemon, which is responsible for building the Docker image. The Docker daemon reads the Dockerfile and executes the instructions within it to create the image.
Executes the instructions in the Dockerfile: The Docker daemon reads each instruction in the Dockerfile and performs the necessary actions, such as copying files, installing dependencies, setting environment variables, and running commands.
Creates the Docker image: As the Docker daemon executes the instructions in the Dockerfile, it creates layers that represent each instruction. These layers are combined to form the final Docker image. Each layer is cached, so if the same instructions are encountered during subsequent builds, Docker can reuse the cached layers, making the build process faster.
Once the docker-compose build command completes, you will have the Docker images ready to be used when running containers with docker-compose up or other related commands.
In summary, docker-compose build builds the Docker images based on the Dockerfiles defined in your docker-compose.yml file, allowing you to create the necessary images required to run your services as containers.
If your docker-compose.yml is correctly formatted, after running the docker-compose build command you should see something like this in terminal:

docker-compose build effectively does the same as docker build however it does it via the Dockerfile provided. It builds and tags the Docker image appropriately for running our docker-compose configuration.
docker-compose buildis a specialized command for building images within a Docker Compose environment, whiledocker buildis a general-purpose command for building Docker images independent of Docker Compose.
Now we have configured our project to use Docker, let's create our Django project via docker-compose. Because Django is installed inside our Docker image we can run the Django CLI commands just as if they were installed on our local machine. To do this run the following command in the terminal:
❯ docker-compose run --rm app sh -c "django-admin startproject app ."
When you run the above command it creates a new Django project named "app" inside the Docker container associated with the app service defined in the docker-compose.yml file.
The command docker-compose run --rm app sh -c "django-admin startproject app ." performs the following actions:
docker-compose run: This command is used to run a one-time command within a service defined in thedocker-compose.ymlfile.--rm: This flag instructs Docker Compose to automatically remove the container after it finishes running. This helps keep your system clean by removing temporary containers.app: This specifies the service name defined in thedocker-compose.ymlfile that you want to run the command in. In this case, the service name isapp.sh -c "django-admin startproject app .": This is the command that will be executed inside the container. It runs thedjango-admin startproject app .command using the shell (sh) with the option-cto execute the provided command as a string.django-admin: This is the command-line utility provided by Django for various administrative tasks.startproject: This is a command provided bydjango-adminto create a new Django project.app: This is the argument passed to thestartprojectcommand, specifying the name of the project to be created..: This specifies the current directory as the target location for creating the new Django project. The.represents the current working directory.
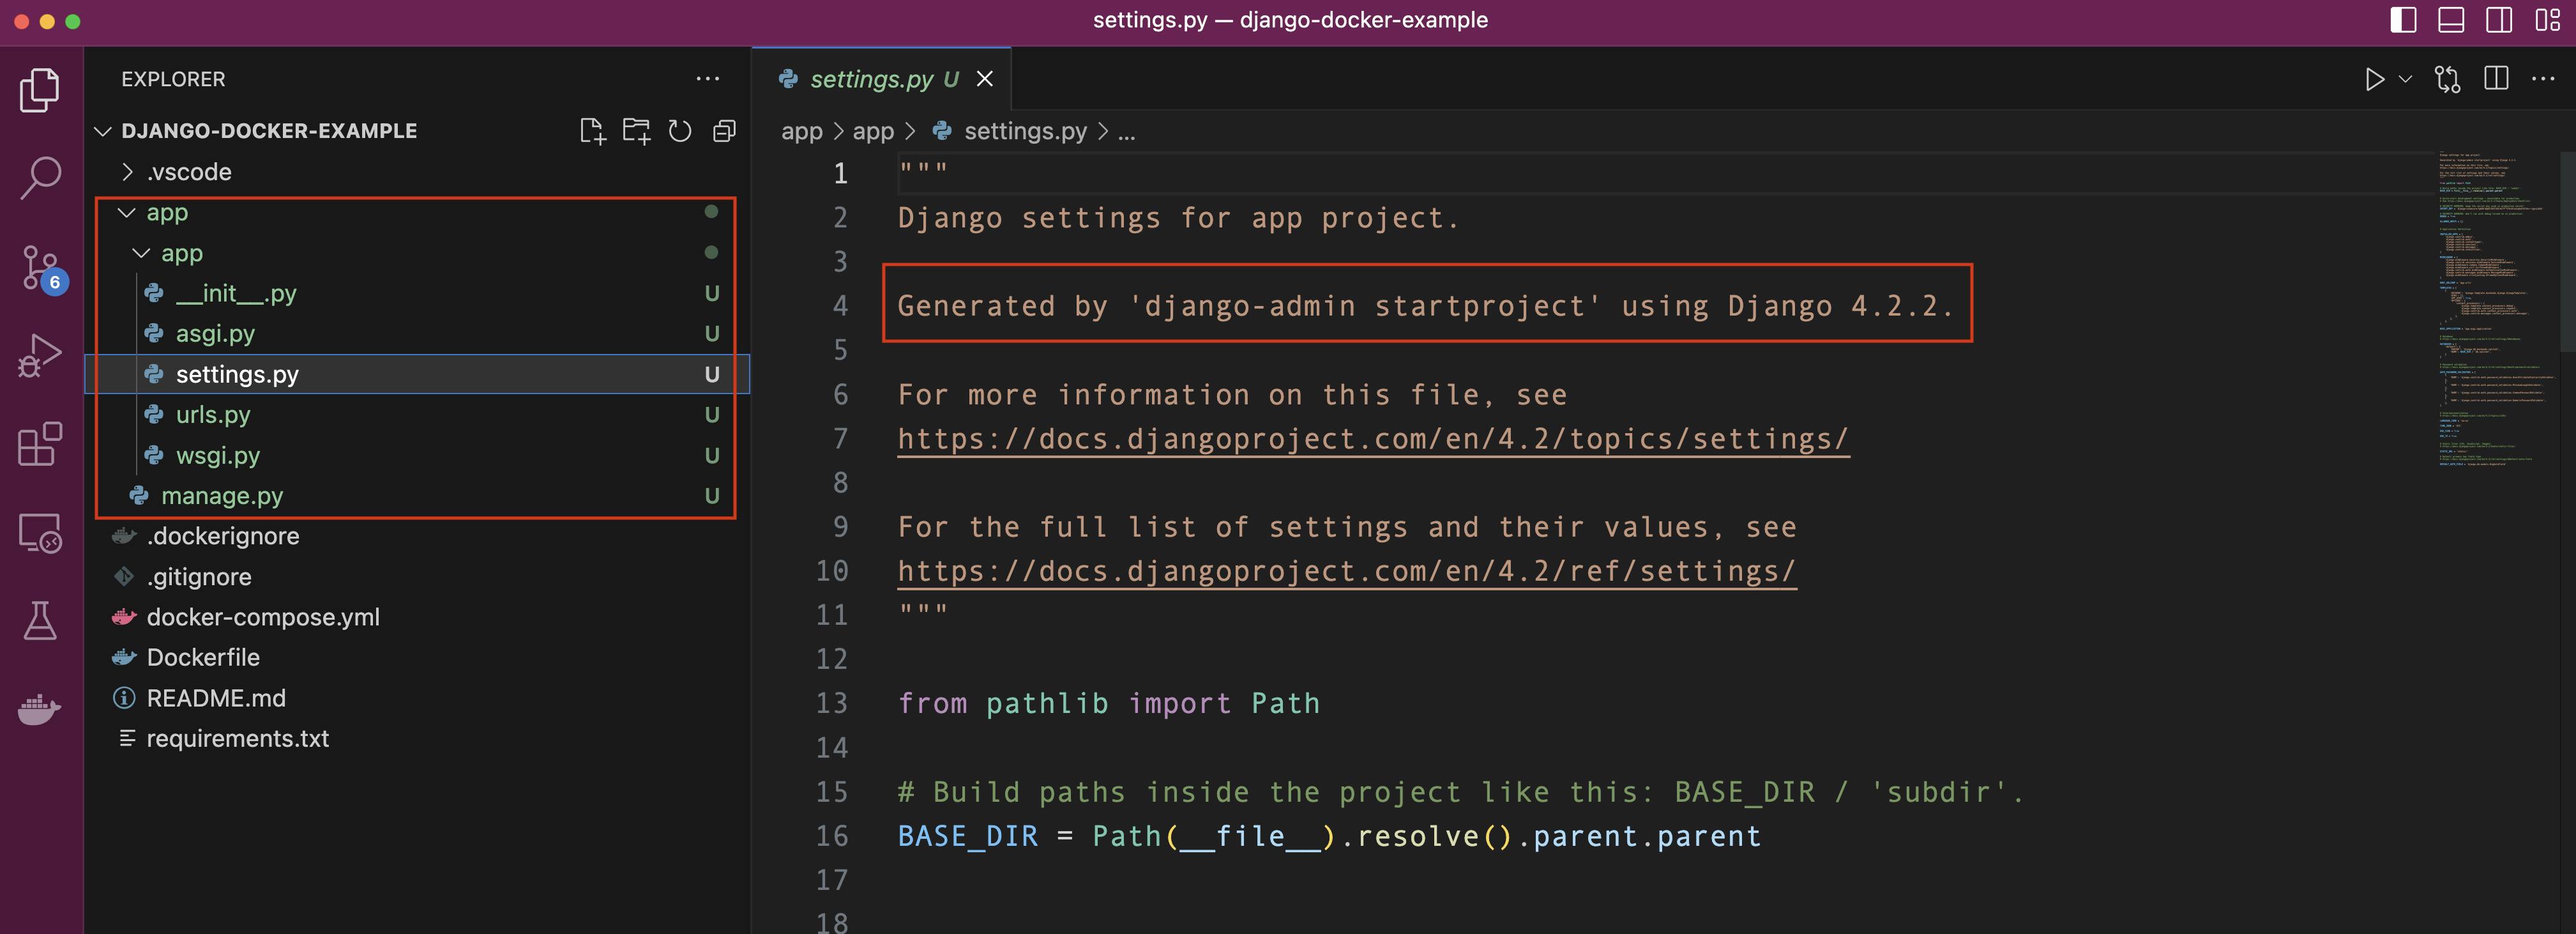
After running the command you should see the new Django project files created inside the app directory:
Running our development server
Now we have created our Dajngo project, let's run the development server to see the project running in the browser. To do this we need to run the docker-compose up in the terminal to start our Docker Compose services defined in our docker-compose.yml file:
❯ docker-compose up
This command builds and starts the Docker containers, including the Django app container. You should see the output logs indicating the progress of the container startup.
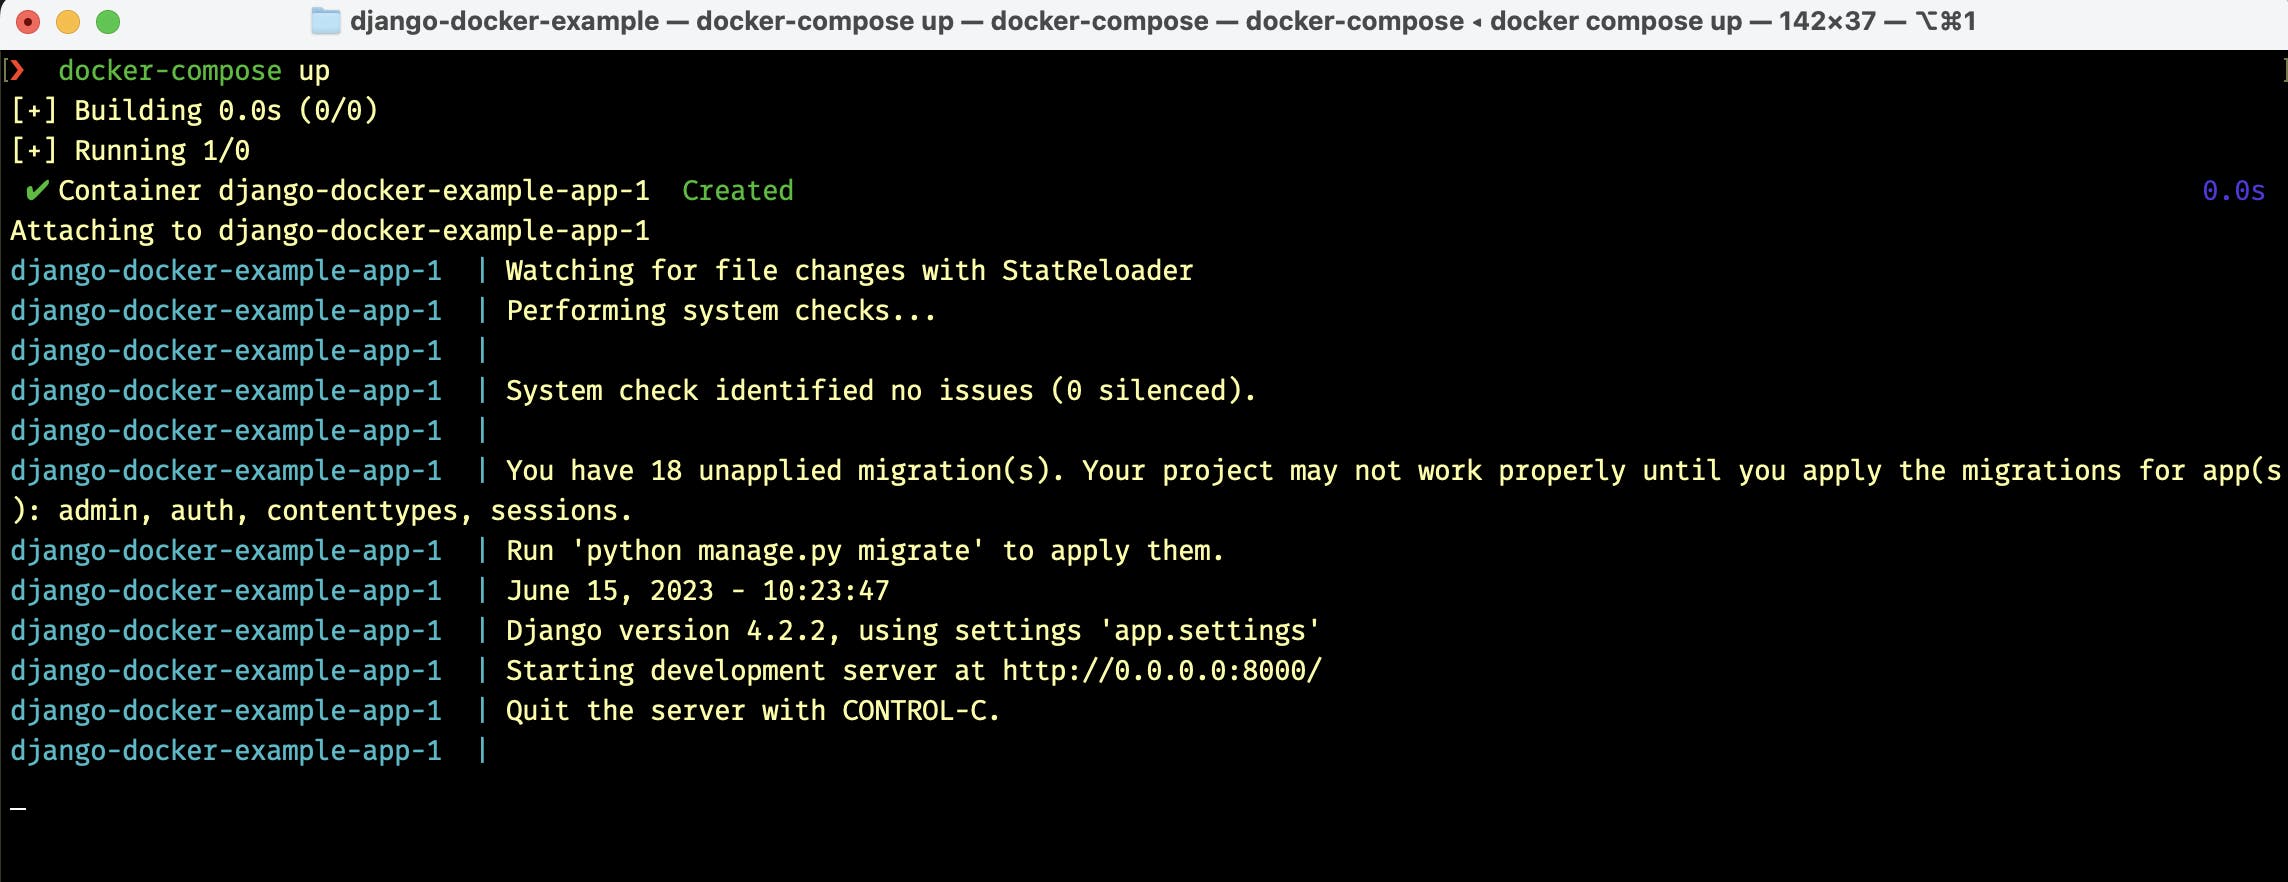
Now if we head over to http://127.0.0.1:8000/ in our browser we should see the Django Launch page. This means that we have configured everything correctly with Docker.

Configuring our PostgreSQL database
PostgreSQL is a powerful and feature-rich open-source relational database management system. It is widely known for its robustness, scalability, and extensibility, making it a popular choice for various applications. PostgreSQL is also one of the officially supported databases for Django.
Again, we will be using Docker Compose to configure a PostgreSQL for our django-docker-example project. Docker Compose allows us to define and manage our PostgreSQL database as a service alongside our application. The configuration is specified in a simple YAML file, making it easy to set up and maintain.
Overall, Docker Compose simplifies the management of our PostgreSQL database, provides a consistent and reproducible environment, and enhances the scalability and portability of our project.
Using Docker Compose with persistent volumes allows you to retain the data stored in your PostgreSQL database even when the container is stopped or restarted. This is particularly useful during local development or testing phases, where you want to preserve the database state between sessions.
By configuring persistent volumes in Docker Compose, you can map a directory on your host machine to a directory inside the PostgreSQL container where the database data is stored. This ensures that the data persists even if the container is destroyed or recreated.
With persistent volumes, you can make changes to your application, update the container, or even stop and restart it without worrying about losing the database data. This enables you to iterate on your development process and experiment with different configurations, all while maintaining the integrity of your database.
Essentially we are going to have Docker Compose configured to have two different services the database service and the app service. So the database is going to run the Postgres application and the app is going to run our Django application. These two services are going to be able to communicate with each other so that the Django app can access and read and write data on the Postgres database.
The docker-compose.yml file defines the services required for the application. In this case, there are two services:
App Service: This service represents the Django application container. It contains the Django web application and any necessary dependencies. The service is defined with configuration details specific to the Django application, such as build context, ports, volumes, and the command to run the Django development server.
Database Service: This service represents the PostgreSQL database container. It is responsible for storing and managing the application's data. The service is defined with the necessary configuration for the PostgreSQL container, including environment variables, volumes, and ports.

Together, Docker Compose manages the interaction between these services, ensuring they are properly configured and can communicate with each other. This architecture allows for easy development, deployment, and scaling of the Django application with PostgreSQL as the database backend, all within isolated and reproducible containers.
The network connectivity is handled automatically by Docker Compose between our two services.
In our docker-compose.yml we have the app service already defined, so let's define our database service, indentation is very important, so make sure the database service is level with the app service. I will be using the official postgres image which can be found on the docker hub website.
version: "3.9"

services:
  app:
    build:
      context: .
    ports:
      - "8000:8000"
    volumes:
      - ./app:/app
    command: >
      sh -c "python manage.py runserver 0.0.0.0:8000"

  db:
    image: postgres:13-alpine
after the db service is added we also need to add the volumes again, pay close attention to the indentation this needs to be level with the start of the file and our volume name will be dev-db-data note that we don't need to add anything after the colon : here because this is going to be handled automatically by Docker Compose using the default location of the file system.
version: "3.9"

services:
  app:
    build:
      context: .
    ports:
      - "8000:8000"
    volumes:
      - ./app:/app
    command: >
      sh -c "python manage.py runserver 0.0.0.0:8000"

  db:
    image: postgres:13-alpine

volumes:
    dev-db-data:
Once the volumes is set up we can complete our db service adding the volume and environment sections:
version: "3.9"

services:
  app:
    build:
      context: .
    ports:
      - "8000:8000"
    volumes:
      - ./app:/app
    command: >
      sh -c "python manage.py runserver 0.0.0.0:8000"

  db:
    image: postgres:13-alpine
    volumes:
        - dev-db-data:/var/lib/postgresql/data
    environment:
        - POSTGRES_DB=your_database_name
        - POSTGRES_USER=your_username
        - POSTGRES_PASSWORD=your_password

volumes:
    dev-db-data:
Our db service sets up the development PostgreSQL database using the postgres:13-alpine image from Docker Hub. The volumes section creates a named volume called dev-db-data and mounts it to the /var/lib/postgresql/data directory inside the container. This ensures that the database data persists even if the container is restarted.
The environment section specifies environment variables, such as the database name (POSTGRES_DB), the username (POSTGRES_USER), and password (POSTGRES_PASSWORD), which can be customized as needed. Here we are setting up the initial database configuration for our new db service. Remember these configurations are just for our local development server! For deployment, you should not be hard coding real credentials inside our docker-compose.yml source code!
Finally, we need to add similar environment variables to our app service. Essentially telling our app service how to connect to our database.
version: "3.9"

services:
  app:
    build:
      context: .
    ports:
      - "8000:8000"
    volumes:
      - ./app:/app
    command: >
      sh -c "python manage.py runserver 0.0.0.0:8000"
    environment:
      - DB_HOST=db
      - DB_NAME=your_database_name
      - DB_USER=your_username
      - DB_PASS=your_password
    depends_on:
      - db


  db:
    image: postgres:13-alpine
    volumes:
      - dev-db-data:/var/lib/postgresql/data
    environment:
        - POSTGRES_DB=your_database_name
        - POSTGRES_USER=your_username
        - POSTGRES_PASSWORD=your_password

volumes:
    dev-db-data:
save the docker-compose.yml. In the instructions above the depends_on directive ensures that the db service starts before the app service, allowing the Django application to connect to the PostgreSQL database.
Note: Make sure to replace
your_database_name,your_username, andyour_passwordin theenvironmentsection with your desired values for the PostgreSQL database.
Once again to run the Docker Compose configuration, you can use the following command in your terminal:
❯ docker-compose up
By default, the command will run in the foreground, displaying the logs of all the services. If you want to run the containers in detached mode (in the background), you can add the -d flag:
❯ docker-compose up -d
With this flag -d, the containers will be started in the background, and you'll get your command prompt back.
You can stop the running services by pressing Ctrl + C in the terminal where you ran docker-compose up. If you started the services in detached mode, you can use the following command to stop them:
❯ docker-compose down
This command will stop and remove the containers, networks, and volumes created by Docker Compose.
Remember to navigate to the directory where your
docker-compose.ymlfile is located before running thedocker-composecommands.
If everything is configured correctly, you should see the services being started in the Terminal:

Setting up Django and configuring our database
Now we need to configure Django, telling it how it will connect to our database we also have to make sure we have our PostgreSQL adaptor dependencies installed. These are the dependencies that are required inside our Docker Container in order to allow Django to connect to our database. Remember, whenever we use new libraries in our Django application, we also need to update our projects requirements.txt file.
Before Django can connect to a database it needs to know the type of Engine required to connect to the database. In our application, this is the Postgres engine. Django also needs to know the Hostname, which is either the IP address or domain name for our database, the Port number, which is 5432 (the default port number for Postgres) and finally the Database name and user login credentials of our application. These settings are all defined in Django's settings.py, so we need to replace the default SQLite settings with our new Postgres database settings.
In the app folder find the settings.py
# Database
# https://docs.djangoproject.com/en/4.2/ref/settings/#databases

DATABASES = {
    'default': {
        'ENGINE': 'django.db.backends.sqlite3',
        'NAME': BASE_DIR / 'db.sqlite3',
    }
}
and replace the default SQLite database settings with our applications PostgreSQL configuration:
# Database
# https://docs.djangoproject.com/en/4.2/ref/settings/#databases
#https://docs.djangoproject.com/en/4.2/ref/databases/#postgresql-notes

DATABASES = {
    'default': {
        'ENGINE': 'django.db.backends.postgresql',
        'NAME': os.environ.get('DB_NAME'),
        'USER': os.environ.get('DB_USER'),
        'PASSWORD': os.environ.get('DB_PASS'),
        'HOST': os.environ.get('DB_HOST'),
        'PORT': '5432',
    }
}
Note: In Django 4.2 make sure you import the
osmodule at the top of your settings file :import osAlso we can delete the default SQLite database as we will no longer use it. So deletedb.sqlite3from the project directory.
As you can see from the above code, we will be pulling all the information for the database configuration from the environment variables. In Docker, you can set environment variables in the docker-compose.yml file using the environment keyword within a service. We'll do this shortly...
Environment variables in Docker are a way to pass configuration information to containers at runtime. They are key-value pairs that can be set within the container environment and are accessible by the running processes within the container.
Environment variables provide a flexible and portable way to configure containerized applications. They allow you to separate the configuration from the application code, making it easier to manage different deployment environments (such as development, staging, and production) without modifying the application itself.
PostgreSQL adaptor - Psycopg2
Psycopg2 is the most popular PostgreSQL adapter for Python. It is also an official package supported and recommended by Django. It is a library that allows Python programs to communicate with PostgreSQL databases. Psycopg2 provides a convenient and efficient way to interact with PostgreSQL databases using the Python programming language.
With Psycopg2, you can perform various database operations such as connecting to a PostgreSQL server, executing SQL queries, fetching results, inserting or updating data, and more. It supports a wide range of PostgreSQL features and data types, making it a powerful tool for working with PostgreSQL databases in Python.
Psycopg2 is widely used in Django projects that use PostgreSQL as the database backend. Django uses the psycopg2 library internally to interact with PostgreSQL databases, handling tasks such as database connections, query execution, and result processing.
Installing Psycopg2
To install Psycopg2 in our Alpine-based Docker image, you will need to install some dependencies along with the library. These are:
postgresql-client: This package provides the PostgreSQL client utilities, which can be useful for interacting with PostgreSQL databases.postgresql-dev: This package contains the development files and headers for PostgreSQL, which are needed for compiling and linking Psycopg2 with the PostgreSQL libraries.build-base: This package is a collection of essential build tools, including compilers and libraries, that are necessary for building and installing Python packages from source.musl-dev: This package includes the development files and headers for the Musl C library, which is the implementation of the C standard library used by Alpine Linux.
Most of these dependencies (everything except the postgresql-client) are only needed for installing the Psycopg2 package, they are not needed when running our application. Remember that the best practice for Docker is to clean up any build dependencies. So we also need to customise our Docker file so these packages are cleaned up after we use them.
Cleaning up the packages after installing them is a common practice in Docker to reduce the size of the final image. When you install packages in a Docker image, the package manager downloads and stores the package files in the image layers. These package files can take up valuable disk space.
Once you have installed the necessary packages and built your Python packages, you can remove the development packages and their associated files to minimize the size of the final image.
So to install our Psycopg2 package we need to modify our Dockerfile. In our Dockerfile after we install and upgrade pip command/venv/bin/pip install --upgrade pip && \
we need to add:
apk add --update --no-cache postgresql-client && \
apk add --update --no-cache --virtual .tmp-build-deps \
     build-base postgresql-dev musl-dev && \
Then after the line where we remove the tmp file rm -rf /tmp && \ we need to add the following:
apk del .tmp-build-deps && \
So our final Dockerfile should look like this:
FROM python:3.10-alpine3.13
LABEL maintainer="@pedbad"

ENV PYTHONUNBUFFERED 1

COPY ./requirements.txt /tmp/requirements.txt
COPY ./app /app
WORKDIR /app
EXPOSE 8000

RUN python -m venv /venv && \
    /venv/bin/pip install --upgrade pip && \
    apk add --update --no-cache postgresql-client && \
    apk add --update --no-cache --virtual .tmp-build-deps \
        build-base postgresql-dev musl-dev && \
    /venv/bin/pip install -r /tmp/requirements.txt && \
    rm -rf /tmp && \
    apk del .tmp-build-deps && \
    adduser \
        --disabled-password \
        --no-create-home \
        django-user

ENV PATH="/venv/bin:$PATH"

USER django-user
Let's walk through the instructions that we have added to our Dockerfile.
apk add --update --no-cache postgresql-client:
This command installs the PostgreSQL client, which is needed for interacting with a PostgreSQL server.
The--updateflag ensures that the package repository is updated before installation,--no-cacheflag prevents caching the retrieved packages, andpostgresql-clientspecifies the package to install.apk add --update --no-cache --virtual .tmp-build-deps build-base postgresql-dev musl-dev:
This command installs additional development dependencies required for building and installing Python packages that depend on PostgreSQL.
The--virtual .tmp-build-depsflag creates a virtual package group named.tmp-build-depsto facilitate later cleanup. The packages included in this group arebuild-base,postgresql-dev, andmusl-dev.build-baseprovides essential build tools,postgresql-devcontains development files for PostgreSQL, andmusl-devincludes development files for the Musl C library used by Alpine Linux.apk del: This command is used to remove packages from the system..tmp-build-deps: This argument specifies the name of the virtual package group that we want to remove.
Save the Dockerfile.
Also make sure you update the project's requirements.txt file with the psycopg2 package:
Django>=4.2.2,<4.3
djangorestframework>=3.14.0,<3.15
psycopg2>=2.8.6,<2.9
After doing this we can rebuild our container and test our Dockerfile to see that it works and all our PostgreSQL dependencies are installed. You can do this by first shutting down any containers you are currently running in Docker and rebuilding the containers.
You can stop the running services by pressing Ctrl + C in the terminal where you ran docker-compose up. If you started the services in detached mode, you can use the following command to stop them:
❯ docker-compose down
This command will stop and remove the containers, networks, and volumes created by Docker Compose. Then build the container again by using :
❯ docker-compose build
Again we are going to rebuild our container by running the new steps that we've modified inside the Docker file, installing our psycopg2 dependencies.

Fixing the database race condition
In the context of Docker Compose and database setup, a race condition refers to a situation where the application code attempts to connect to the database before the database service is fully initialized and ready to accept connections. This can occur when using Docker Compose to orchestrate the startup of multiple services, including the application and the database.
Docker Compose starts the services concurrently, and there is no guarantee that the database service will be fully initialized and ready for connections by the time the application service starts. This can result in the application failing to connect to the database, leading to errors or unexpected behaviour.
The race condition arises because the application code assumes that the database is available immediately upon startup. However, the database may still be initializing, performing initial setup, or loading data. As a result, the application attempts to connect to the database prematurely, leading to connection failures.
Remember in our docker-compose.yml we configured our app service and used the depends-on directive:
services:
  app:
    build:
      context: .
    ports:
      - "8000:8000"
    volumes:
      - ./app:/app
    command: >
      sh -c "python manage.py runserver 0.0.0.0:8000"
    environment:
      - DB_HOST=db
      - DB_NAME=devdb
      - DB_USER=devuser
      - DB_PASS=changeme
    depends_on:
      - db
The depends_on directive in Docker Compose helps control the startup order of services, but it does not guarantee that the dependent service is fully initialized and ready to accept connections before the dependent service starts. As a result, even with depends_on specified, a race condition can still occur.
The depends_on directive only waits for the dependent service to start, not for it to be fully operational. It does not account for the time required for the database service to initialize, set up the database schema, or load data. Therefore, the application service may start and attempt to connect to the database before it is fully ready, leading to a race condition.
To avoid this race condition, it is best practice to implement a custom Django management command that addresses the race condition issue between the Django application and the database. This custom command ensures that the application waits for the database to be ready before proceeding with its execution.
Before we create our management command we need to create a new Django app so we can add our command to it. I will call this new Django app core. So in the terminal lets use docker-compose to create the core app for us:
docker-compose run --rm app sh -c "python manage.py startapp core"
The command will add the core app to our project:
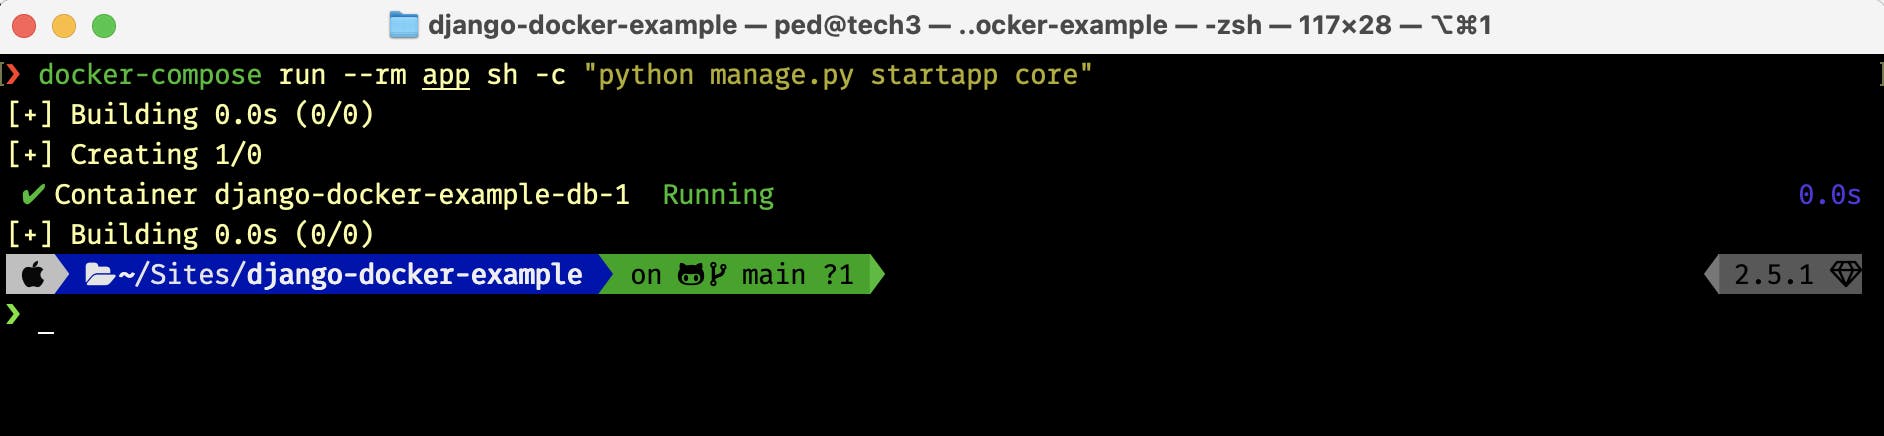
You should now see the new core directory in your project:

In our core app we can delete the test.py and views.py as we are not going to use them. Instead, we will create a tests directory with an __init__.py file inside.

Don't forget, as we have created a new Django app we will also need to reference it in our settings.py file
INSTALLED_APPS = [
    'django.contrib.admin',
    'django.contrib.auth',
    'django.contrib.contenttypes',
    'django.contrib.sessions',
    'django.contrib.messages',
    'django.contrib.staticfiles',
    #
    'core',
]
Now that we have our core app created we are ready to add our custom wait_for_db command. You can read the official Django documentation to see how to create custom django-admin commands.
To create our custom command, inside our core app we need to create a new management directory with an __init__.py file. Inside the management directory, we need to create a commands directory, again with an __init__.py file.
Inside this commands directory, we will add our wait_for_db.py command:
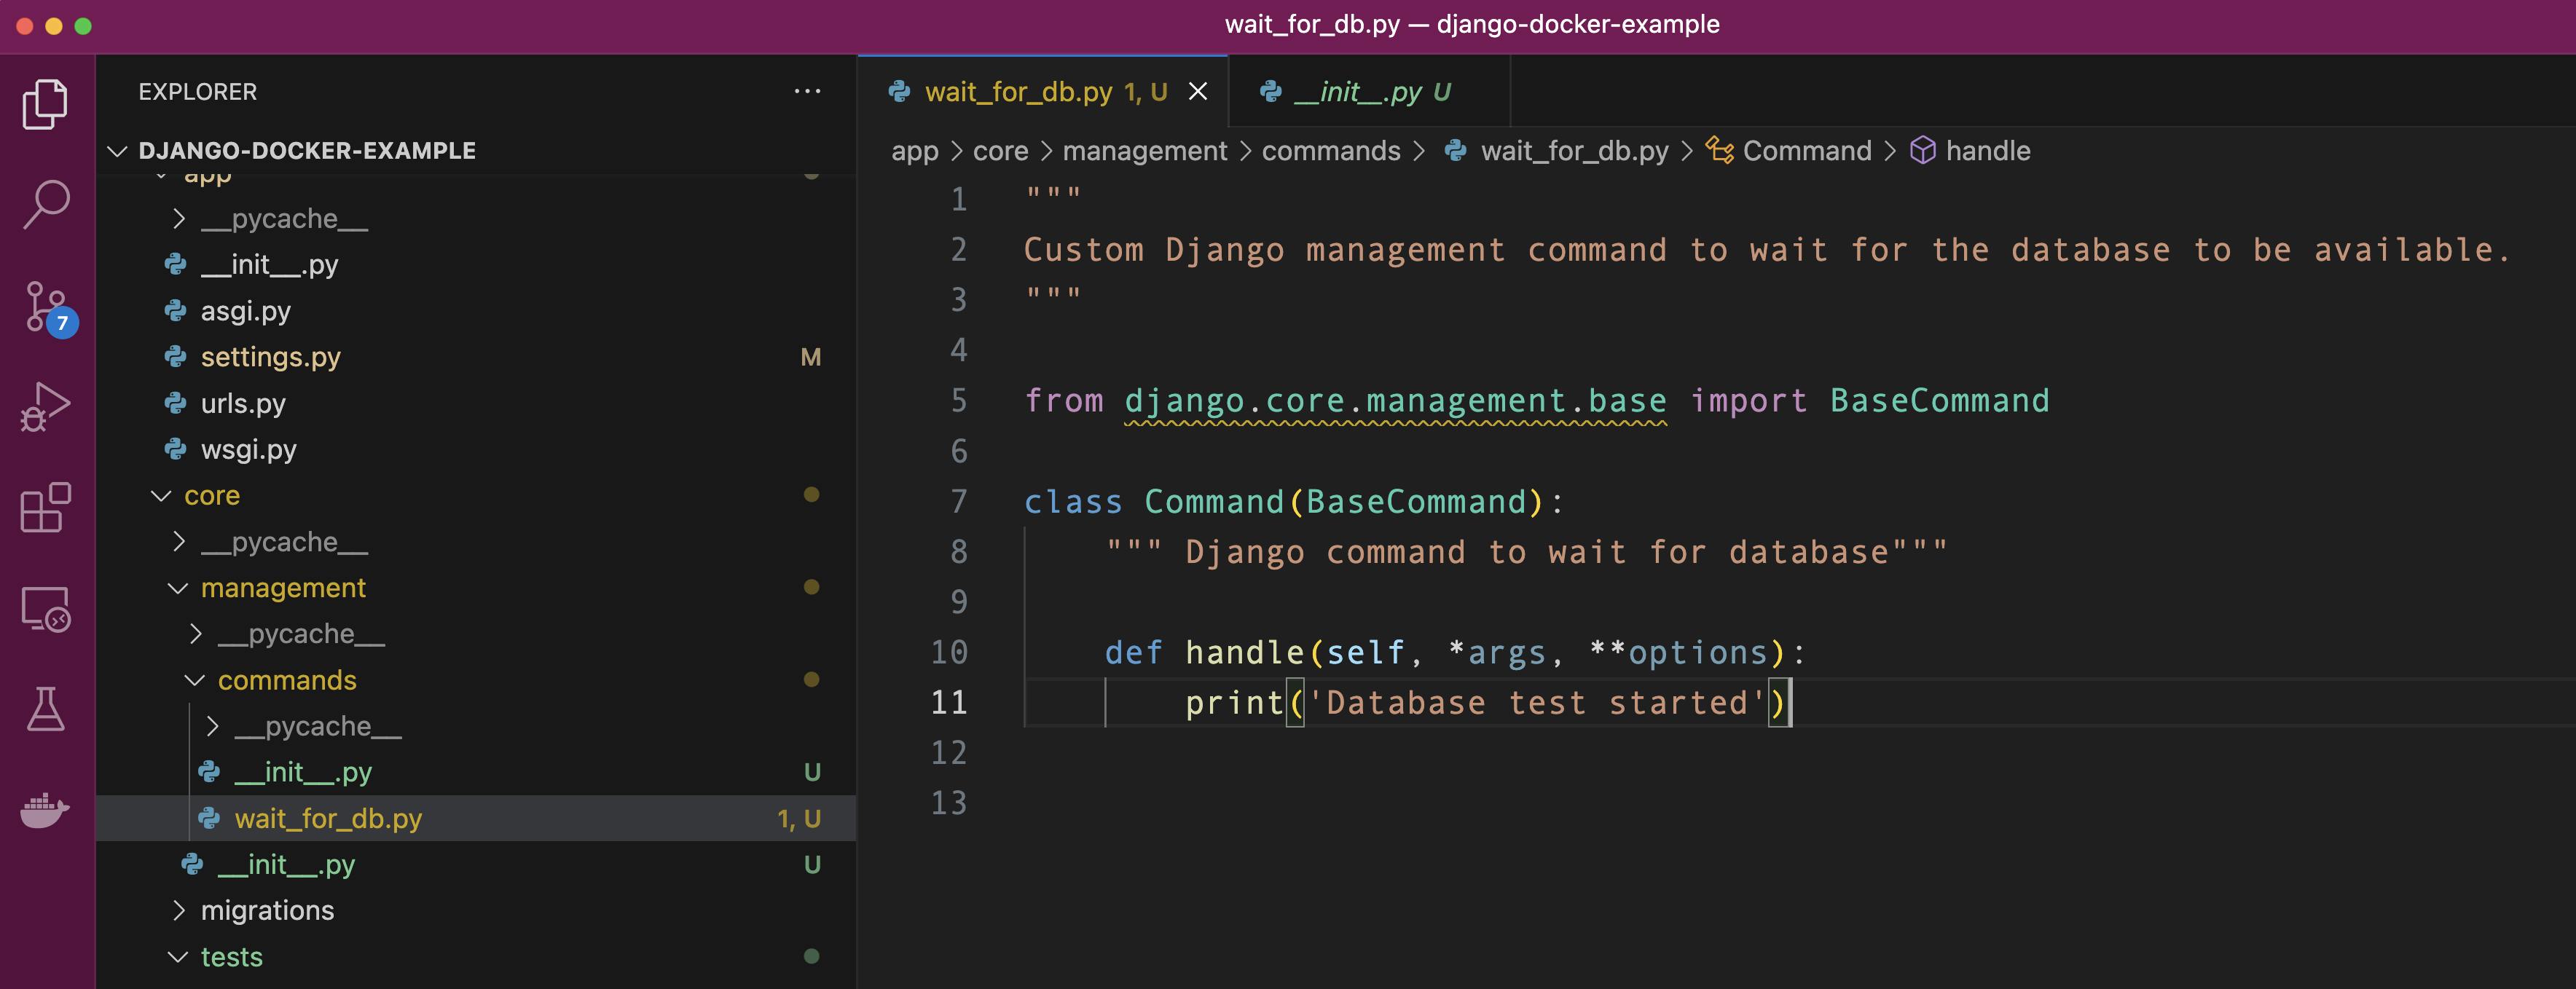
By using this directory structure Django will automatically detect our wait_for_db.py as a management command. Let's write a simple class just to check that we can call this Django management command. In the wait_for_db.py file add the following:
"""
Custom Django management command to
wait for the database to be available.
"""

from django.core.management.base import BaseCommand

class Command(BaseCommand):
    """ Django command to wait for database"""

    def handle(self, *args, **options):
        print('Database test started')
let's run through this code
The
BaseCommandclass fromdjango.core.management.baseis imported. This class is used as the base class for custom management commands in Django.A new class called
Commandis defined, which inherits fromBaseCommand. This class represents the custom management command.Inside the
Commandclass, there is ahandlemethod. This method is automatically called when the command is executed.The
handlemethod, in this case, simply prints the message "Database test started" to the console. This is a placeholder implementation and can be customized to include the logic for waiting for the database to be available.
Once you have implemented the custom management command, you can run it using the manage.py script provided by Django, like any other management command.
let's test this, in the terminal let's run this custom command using docker-compose.
❯ docker-compose run --rm app sh -c "python manage.py wait_for_db"
after running the command we should see our print('Database test started') in the terminal:

Before we implement the actual command, using test-driven development principles, let's write our unit test for the command first, then write our wait_for_db code and make sure it passes the test.
Remember in our core app we created a tests directory. Inside this directory let's create a new file and call it test_commands.py
In our test_commands.py we will import some libraries we will need to test our database.
"""
Test custom Django management commands.
"""

from django.core.management import call_command
from django.db.utils import OperationalError
from django.test import SimpleTestCase

from psycopg2 import OperationalError as psycopg2Error
from unittest.mock import patch
here is an explanation of the libraries used in the code above:
django.core.management.call_command: This helper library allows you to call Django management commands from Python code.django.db.utils.OperationalError: This library provides an exception class for database-related errors in Django.django.test.SimpleTestCase: This is a base class for creating simple test cases in Django.psycopg2.OperationalError: This exception class is used to handle errors specifically related to PostgreSQL database operations using thepsycopg2library.unittest.mock.patch: This library enables you to mock objects and functions for testing purposes, allowing you to replace them with mock versions and control their behaviour during tests.
These libraries are commonly used in Django projects for various testing and database-related tasks.
Now let's add our code for our first test case, test_wait_for_db_ready which is when the database is ready:
"""
Test custom Django management commands.
"""

from django.core.management import call_command
from django.db.utils import OperationalError
from django.test import SimpleTestCase

from psycopg2 import OperationalError as psycopg2Error
from unittest.mock import patch

@patch('core.management.commands.wait_for_db.Command.check')  # Mocking the check method of the wait_for_db command
class CommandTests(SimpleTestCase):
    """ Test wait_for_db command. """

    def test_wait_for_db_ready(self, patched_check):
        """ Test waiting for database when the database is ready. """
        patched_check.return_value = True  # Mocking the return value of the check method to indicate database readiness

        call_command('wait_for_db')  # Calling the wait_for_db command

        patched_check.assert_called_once_with(databases=['default'])  # Asserting that the check method was called with the correct arguments
This code sets up a test scenario where the wait_for_db command is tested when the database is ready. It ensures that the check method is called with the correct arguments and verifies the expected behaviour of the command. Here is an explanation of the code:
The
@patchdecorator is used to mock thecheckmethod of thewait_for_dbcommand. Remember the BaseCommand class has a check method that allows us to check the status of the database.The
CommandTestsclass inherits fromSimpleTestCase, which is a base class for creating simple Django test cases.The
test_wait_for_db_readymethod is a test case that checks the behaviour of thewait_for_dbcommand when the database is ready. One possible test case is that when we run thewait_for_dbcommand the database is alreadyready.
Inside the test method,
patched_check.return_valueis set toTrueto mock the return value of thecheckmethod, indicating that the database is ready.The
call_commandfunction is used to call thewait_for_dbcommand.Finally,
patched_check.assert_called_once_withasserts that thecheckmethod was called once with the correct arguments (in this case,database=['default']).
In the provided code, if the database is already ready, the
checkmethod is patched to returnTrue, indicating that the database is available. This is done using thepatched_check.return_value = Trueline.When the
call_command('wait_for_db')is executed, thewait_for_dbcommand is invoked. Since thecheckmethod is mocked to returnTrue, the command will immediately proceed without waiting, assuming the database is already ready.The line
patched_check.assert_called_once_with(databases=['default'])asserts that thecheckmethod was called exactly once with the expected argumentdatabases=['default']. This assertion verifies that the command properly interacts with thecheckmethod and passes the correct argument when the database is already ready.
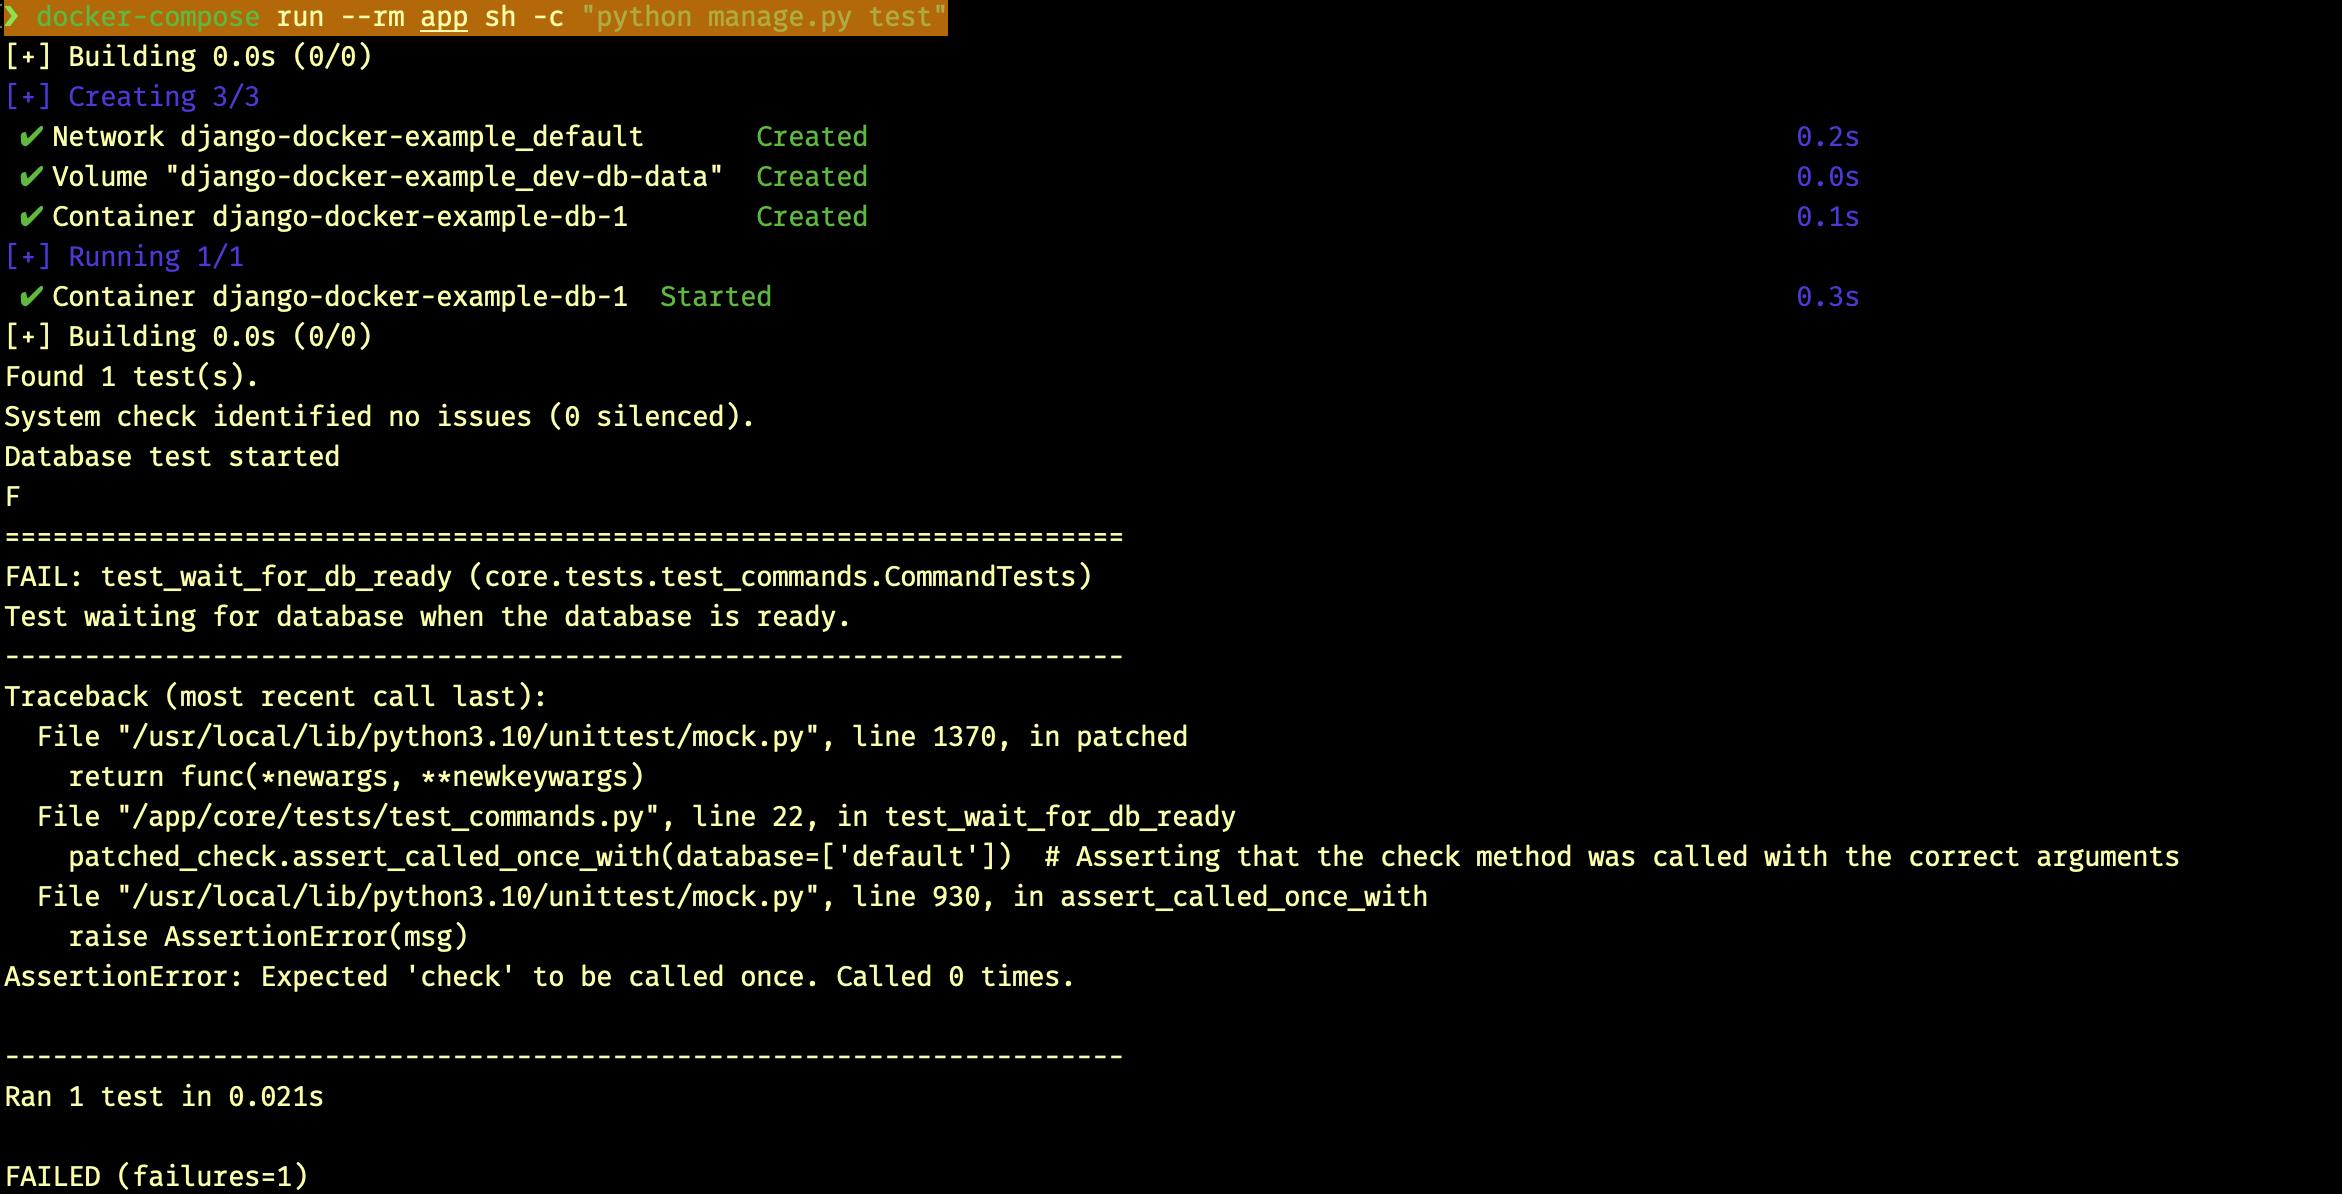
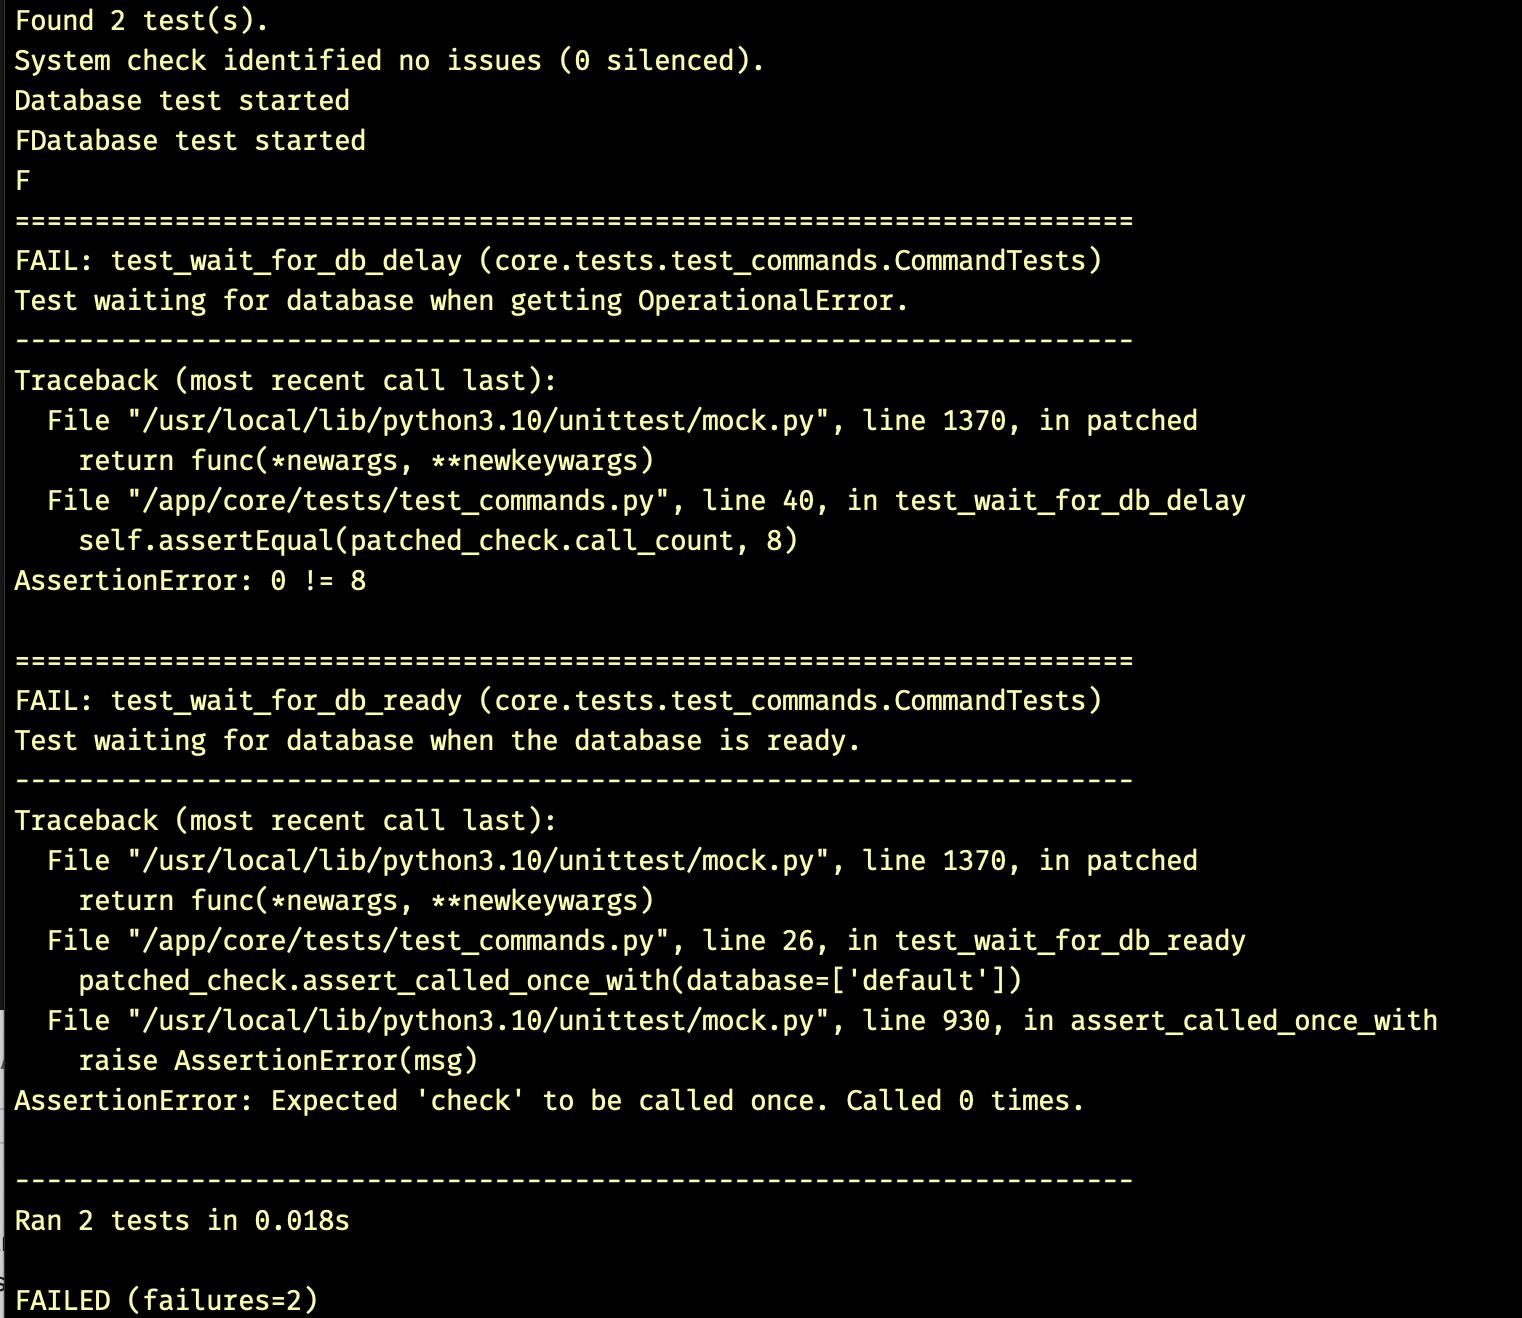
let's run our test, remember the test will FAIL as we have not implemented our actual wait_for_db command yet!
❯ docker-compose run --rm app sh -c "python manage.py test"
Let's add our second test case, what happens if our database isn't ready yet, we want to delay connecting to the database, that is wait for a few seconds and try again test_wait_for_db_delay :
@patch('time.sleep')
def test_wait_for_db_delay(self, patched_sleep, patched_check):
    """Test waiting for database when getting OperationalError. """

    # Configure the side effect of the patched check method
    patched_check.side_effect = [psycopg2Error] * 3 + \
        [OperationalError] * 4 + [True]

    # Calling the wait_for_db command
    call_command('wait_for_db')

    # Assert the number of times the check method was called
    self.assertEqual(patched_check.call_count, 8)

    # Assert that the check method was called with the correct arguments
    patched_check.assert_called_with(databases=['default'])
The
@patch('time.sleep')decorator mocks thetime.sleepfunction for the duration of the test. This allows us to control and observe the behaviour of thesleepfunction.The
test_wait_for_db_delaymethod is defined as a test case for waiting for the database when encountering anOperationalError.The
patched_sleepandpatched_checkarguments are passed to the test method to represent the patched versions oftime.sleepandcheckfunctions, respectively.We configure the side effect of the
patched_checkfunction using theside_effectattribute. In this case, it raises three instances ofpsycopg2Error, followed by four instances ofOperationalError, and finally returnsTrueto indicate that the database is ready.We call the
wait_for_dbcommand, which is the command we want to test. This executes the logic of waiting until the database becomes available.We use
self.assertEqualto assert that thecheckmethod was called exactly eight times. This verifies that the retries were made correctly according to the defined side effects.We use
patched_check.assert_called_withto assert that thecheckmethod was called with the correct arguments. In this case, it should be called with thedatabasesargument set to['default'].
Overall, this test ensures that the wait_for_db command correctly handles the specified exceptions and retries the connection to the database until it becomes available.
Again save the code and run the test again to make sure the code syntax is correct, remember we still haven't implemented our wait_for_db code so obviously the test will fail.
❯ docker-compose run --rm app sh -c "python manage.py test"
The final test_commands.py should look like this:
"""
Test custom Django management commands.
"""

from django.core.management import call_command
from django.db.utils import OperationalError
from django.test import SimpleTestCase

from psycopg2 import OperationalError as psycopg2Error
from unittest.mock import patch

@patch('core.management.commands.wait_for_db.Command.check')  # Mocking the check method of the wait_for_db command
class CommandTests(SimpleTestCase):
    """Test wait_for_db command."""

    def test_wait_for_db_ready(self, patched_check):
        """Test waiting for database when the database is ready."""

        # Mocking the return value of the check method to indicate database readiness
        patched_check.return_value = True

        # Calling the wait_for_db command
        call_command('wait_for_db')

        # Asserting that the check method was called with the correct arguments
        patched_check.assert_called_once_with(databases=['default'])


    @patch('time.sleep')
    def test_wait_for_db_delay(self, patched_sleep, patched_check):
        """Test waiting for database when getting OperationalError."""

        # Configure the side effect of the patched check method
        patched_check.side_effect = [psycopg2Error] * 3 + [OperationalError] * 4 + [True]

        # Calling the wait_for_db command
        call_command('wait_for_db')

        # Assert the number of times the check method was called
        self.assertEqual(patched_check.call_count, 8)

        # Assert that the check method was called with the correct arguments
        patched_check.assert_called_with(databases=['default'])
Implementing our wait_for_db custom command
Now we have written our tests we can implement our code for the wait_for_db custom management command and check that it passes all our tests.
Inside the wait_for_db.py I will modify the initial stub code as follows:
"""
Custom Django management command to wait for the database to be available.
"""
import time

from django.core.management.base import BaseCommand
from django.db.utils import OperationalError
from psycopg2 import OperationalError as Psycopg2OpError


class Command(BaseCommand):
    """ Django command to wait for database"""

    def handle(self, *args, **options):
        """Entrypoint for command."""
        self.stdout.write('Waiting for database...')
        is_database_up = False
        while is_database_up is False:
            try:
                self.check(databases=['default'])
                is_database_up = True
            except (Psycopg2OpError, OperationalError ):
                self.stdout.write(self.style.WARNING('Database is unavailable, waiting 1 second...'))
                time.sleep(1)

        self.stdout.write(self.style.SUCCESS('Database is available!'))
This code defines a custom Django management command called "wait_for_db" that waits for the database to be available before proceeding with further execution. Here's a breakdown of the code:
The command extends the
BaseCommandclass provided by Django, which provides a foundation for creating custom management commands.The
handlemethod is the entry point for the command. It is executed when the command is run.The variable
is_database_upis initially set toFalse, indicating that the database is not yet available.A while loop is used to repeatedly check if the database is up. The loop continues until
is_database_upbecomesTrue, indicating that the database is available.Inside the loop, the
self.check()method is called to check the status of the database. The'default'database is specified.If an
OperationalErrororPsycopg2OpErrorexception occurs during the check, it means the database is not yet available. A warning message is displayed usingself.stdout.write()andself.style.WARNING().The code waits for 1 second using
time.sleep(1)before rechecking the database status in the next iteration of the loop.Once the database becomes available and the
self.check()method does not raise an exception,is_database_upis set toTrue, and the loop is exited.Finally, a success message 'Database is available!' is displayed using
self.stdout.write()andself.style.SUCCESS().
This command can be used to ensure that the database is ready before running other commands or performing operations that rely on the availability of the database.
Now we have implemented the code, we can use Docker Compose to run our tests again, and this time the tests should pass!
❯ docker-compose run --rm app sh -c "python manage.py test"
In the terminal we should see our tests running and the expected output:

Note: Since we set up our wait_for_db as a custom command, we could also use docker-compose to run the actual command like any other Django manage.py commands:
❯ docker-compose run --rm app sh -c "python manage.py wait_for_db"
Now we have implemented our wait_for_db command we need to update our docker-compose.yml file configuration so that our wait_for_db command runs before we start our server. We can also add the python manage.py migrate command too. So in the docker-compose.yml update the command directive as follows:
command: >
      sh -c "python manage.py wait_for_db &&
             python manage.py migrate &&
             python manage.py runserver 0.0.0.0:8000"
Save the updated docker-compose.yml file. Make sure you stop and clear any running containers by first running the docker-compose down command, followed by running the docker-compose up command.
In the terminal, you can see that the database migrations are done and the Django server is started!

One final step, let's add the command to create a superuser for our Django admin site. So in the docker-compose.yml update the command directive as follows:
command: >
      sh -c "python manage.py wait_for_db &&
             python manage.py migrate &&
             echo \"from django.contrib.auth import get_user_model; User = get_user_model(); User.objects.create_superuser('root', 'admin@example.com', 'root')\" | python manage.py shell &&
             python manage.py runserver 0.0.0.0:8000"
After the
pythonmanage.pymigratecommand, we add an additional command to create a superuser usingpythonmanage.pyshell.The
echocommand is used to pass a Python code snippet that creates the superuser.The code snippet imports the user model,
get_user_model(), and then uses it to create a superuser with the provided username, email, and password.
create_superuser('root', 'admin@example.com', 'root')The
pythonmanage.pyshellcommand runs the Python code snippet within the Django shell.Finally, the
pythonmanage.pyrunserver 0.0.0.0:8000command starts the Django development server as before.
With this updated command, when you run docker-compose up, it will wait for the database, perform migrations, create the superuser, and then start the Django server.
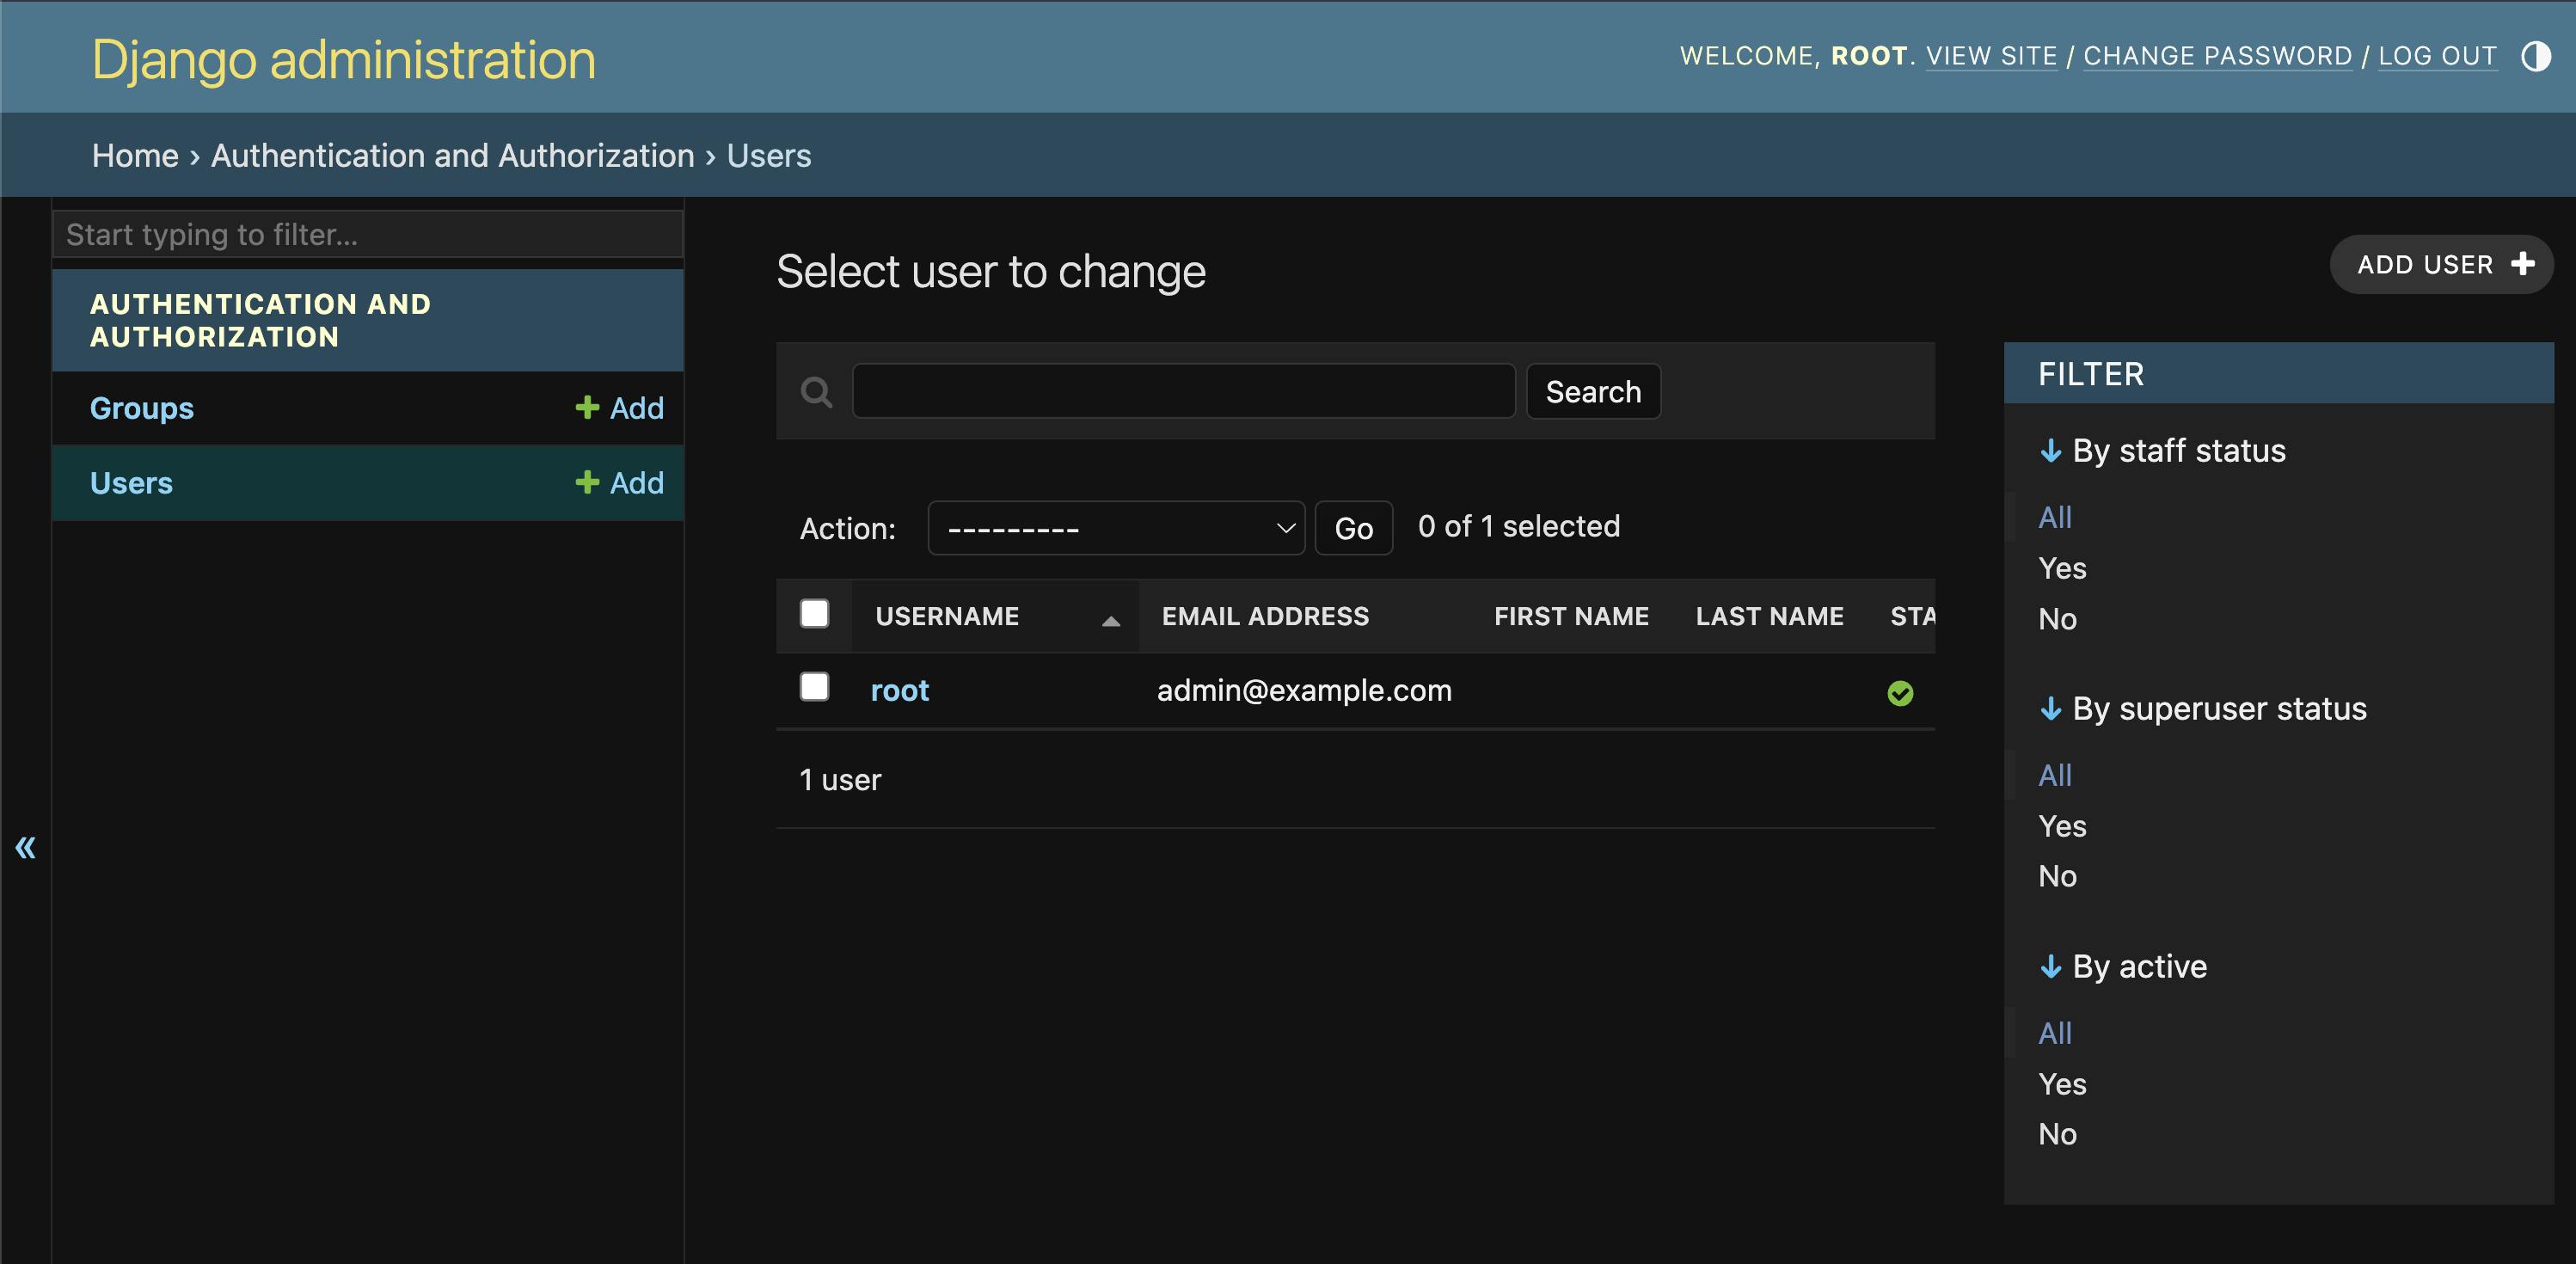
Now after the server has started you can login to the Django admin site using the username: root and password: root.
Thanks for your patience and congrastulations for getting this far!
Deckerizing your Django app with PostgreSQL can be an exciting and rewarding journey. By containerizing your application using Docker and leveraging the power of PostgreSQL, you can unlock numerous benefits.
Docker allows for easy deployment and scalability, ensuring that your app runs consistently across different environments. PostgreSQL, a powerful and reliable database, provides robust data storage capabilities for your Django app.
Embracing this technology stack empowers you to build and deploy your app with confidence, knowing that it is running in a secure and efficient containerized environment. So, take the leap, explore Docker, integrate PostgreSQL, and unlock the potential to streamline your development process, enhance reliability, and deliver exceptional experiences with your Django app. Happy dockerizing!
You can Clone or download the repository from my GitHub: https://github.com/pedbad/django-docker-example.
Resources
These resources should provide you with a solid foundation and further guidance on Docker, Docker Compose, PostgreSQL, Django, and related topics. Happy learning and exploring!
Best practices for writing Dockerfiles: The official Docker documentation provides a comprehensive guide on best practices for writing Dockerfiles. This resource offers valuable tips and recommendations to help you optimize your Dockerfile and build efficient Docker images. You can find it here: Dockerfile Best Practices.
Docker Documentation: The official Docker documentation is a valuable resource for learning about Docker and its various features. It includes comprehensive guides, tutorials, and references for getting started with Docker. You can find it here: Docker Documentation.
Docker Compose Documentation: The official Docker Compose documentation provides detailed information on how to define and manage multi-container Docker applications using Docker Compose. It covers topics such as service configuration, volumes, networking, and more. You can find it here: Docker Compose Documentation.
PostgreSQL Documentation: The official PostgreSQL documentation is a comprehensive resource for learning about PostgreSQL, including installation, configuration, usage, and administration of PostgreSQL databases. It offers detailed explanations, tutorials, and references to help you work with PostgreSQL effectively. You can find it here: PostgreSQL Documentation.
Django Documentation: The official Django documentation is a valuable resource for learning about the Django web framework. It provides in-depth guides, tutorials, and references for building web applications using Django. You can find it here: Django Documentation.
Psycopg2 Documentation: The official Psycopg2 documentation offers detailed information on using Psycopg2 as the PostgreSQL adapter for Python. It provides explanations, examples, and API references to help you work with PostgreSQL databases in your Python projects. You can find it here: Psycopg2 Documentation.
Docker Hub: Docker Hub is the official repository for Docker images, including PostgreSQL images. It offers a wide range of PostgreSQL images with different versions and tags suitable for your Docker setup. You can explore and find the appropriate PostgreSQL image for your application on the Docker Hub website: Docker Hub.
Real Python - Dockerizing Django: A Complete Guide: Real Python provides a comprehensive tutorial on Dockerizing a Django application. This step-by-step guide covers everything from Docker installation to building and running the Docker image. You can find it here: Dockerizing Django.
Test-Driven Development with Django, Docker, and PostgreSQL: This video course demonstrates Test-Driven Development (TDD) principles using Django, Docker, and PostgreSQL. It provides hands-on examples and practical guidance for implementing TDD in your Django projects. You can find the course here: TDD with Django, Docker, and PostgreSQL.